
Floating shelves are one of the most useful and most satisfying DIY projects in any home. They add storage and display space to any wall without taking any floor space, and the floating effect — no visible brackets — makes even a basic build look clean and custom. These DIY floating shelf ideas cover every room and every skill level, from a simple bedroom nightstand shelf to a full TV wall with hidden storage.
This post contains affiliate links. If you purchase through these links I may earn a small commission at no extra cost to you.
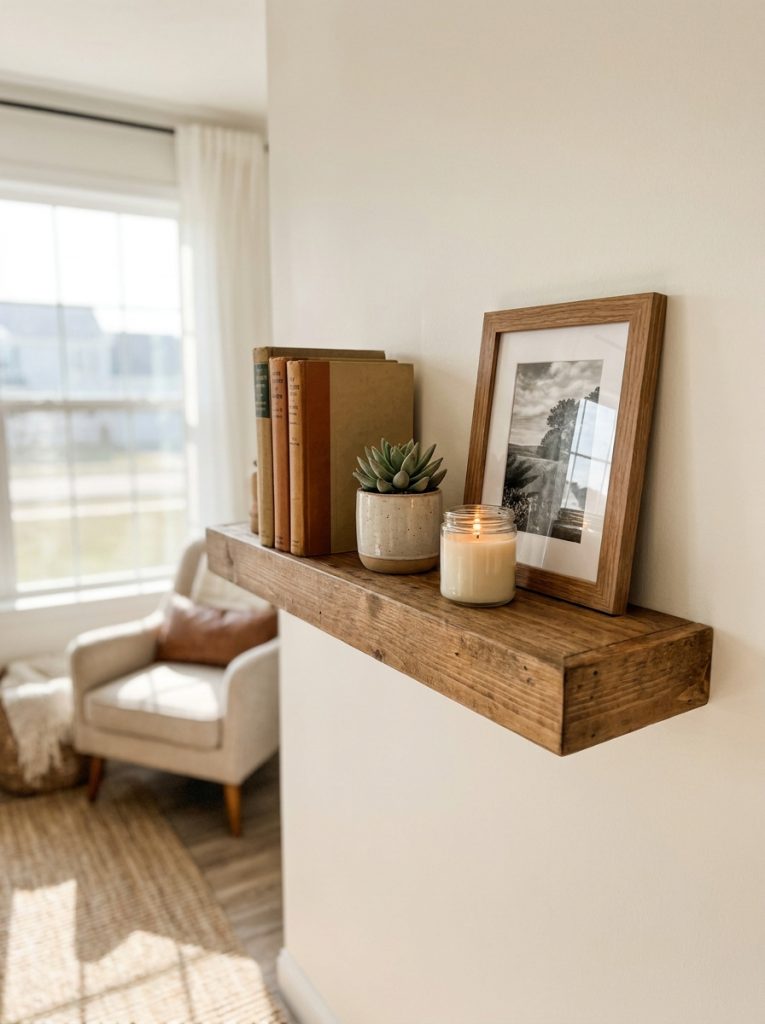
A floating shelf changes any wall from empty to intentional in a single afternoon.
1. Build a Floating Shelf for the TV Wall
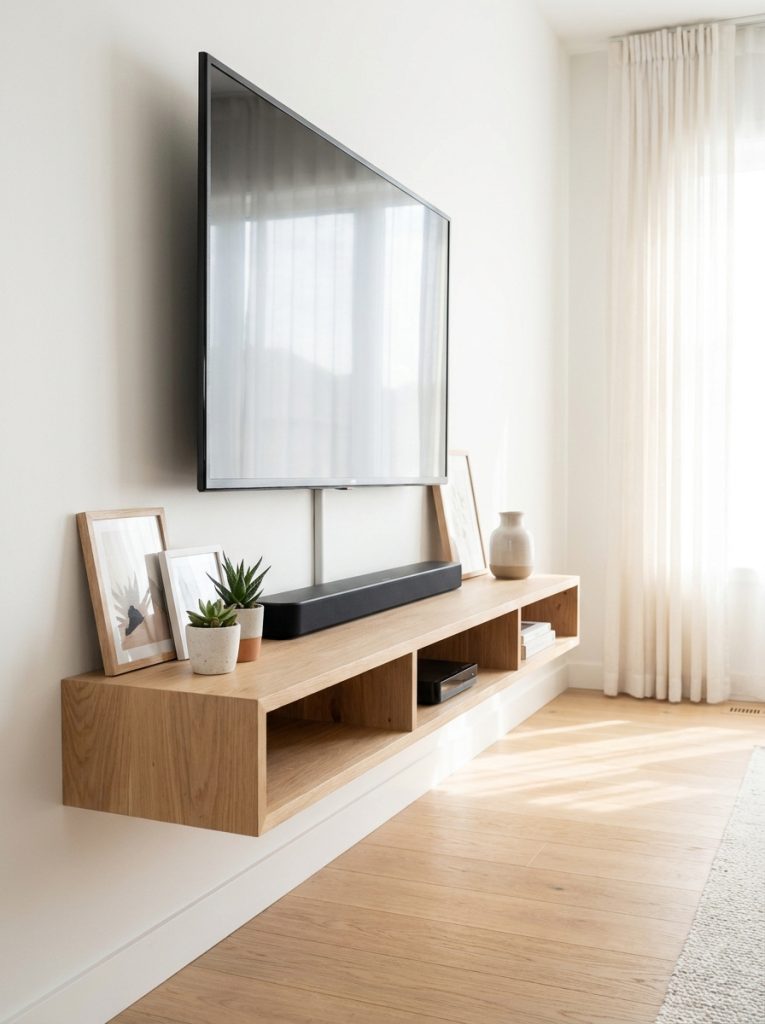
A floating shelf below a wall mounted TV holds the soundbar, media player, and remotes in a clean line that looks intentional and keeps cables off the floor. This floating shelf TV wall mount is the right depth and length for standard TV setups. Build your own from a wide board cut to TV width, finish in a color that matches the room, and mount with a French cleat behind the TV for a perfectly hidden mounting system. For more TV wall ideas check out these DIY fireplace TV wall ideas.
Materials Needed:
- 1×10 or 1×12 board cut to desired length
- French cleat hardware or shelf mounting kit
- Stud finder and drill
- Sandpaper and wood finish
- Level
How to Make It:
- Cut the board to your desired shelf length — typically the same width as the TV.
- Sand smooth and apply stain or paint in your chosen finish.
- Mount the French cleat wall piece into wall studs at the desired shelf height.
- Attach the matching cleat to the back of the shelf board.
- Hook the shelf onto the wall cleat — it hangs securely with no visible hardware.

Floating Shelf TV Wall
Clean floating shelf sized for below a wall mounted TV — holds soundbar and media equipment neatly.
Check Price on Amazon2. Use Heavy Duty Brackets for a Strong Build

Floating shelves that hold heavy items — books, plants, kitchen appliances — need brackets rated for the load. Visible brackets are not always a compromise — the right bracket in black metal or brushed steel becomes a design element rather than just hardware. These heavy duty floating shelf brackets are rated for serious loads and look great paired with a thick raw wood board for an industrial or modern farmhouse shelf. Mount into studs and the shelf holds everything you put on it without flexing.
Materials Needed:
- Heavy duty shelf brackets
- Thick wood board (2×10 or butcher block)
- Stud finder and drill
- Level
- Wood finish
How to Make It:
- Find and mark wall studs at the shelf position.
- Hold brackets against the wall at stud positions and mark screw holes.
- Drill pilot holes and screw brackets firmly into studs.
- Cut and finish the wood board to your desired shelf length.
- Set the board on the brackets and secure with screws from below if the brackets have top mounting holes.

Heavy Duty Floating Shelf Brackets
Heavy duty brackets rated for serious loads — great for book shelves, kitchen shelves, and heavy display shelves.
Check Price on Amazon3. Build a Floating Shelf with a Hidden Drawer
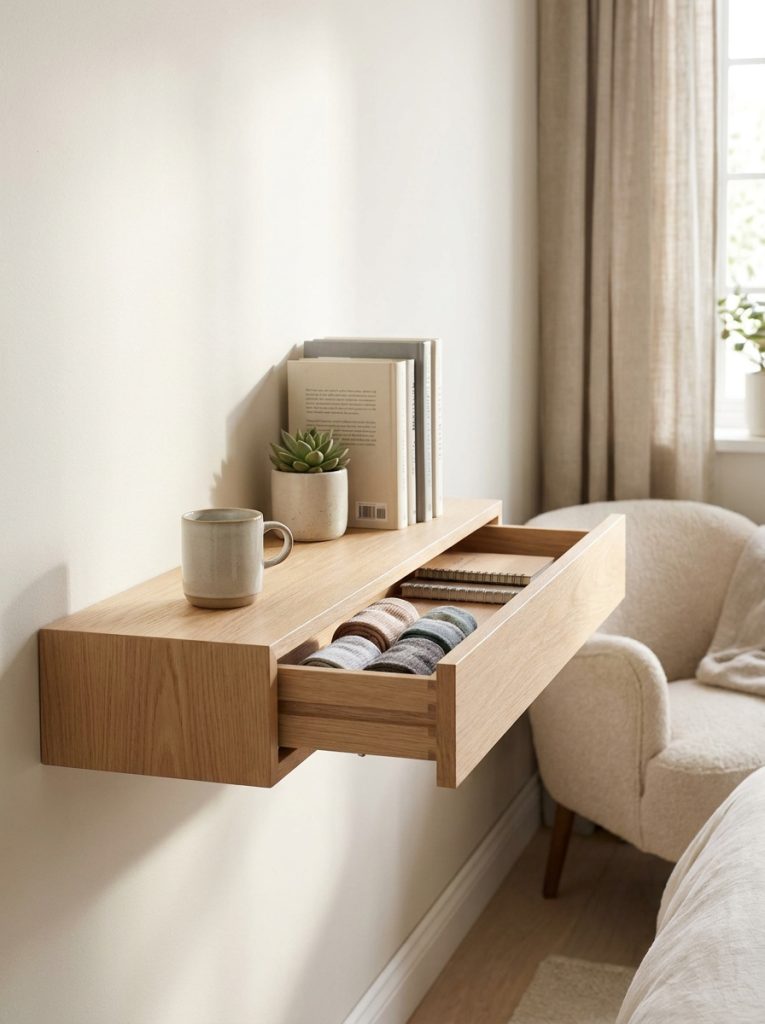
A floating shelf with a hidden drawer underneath looks like a plain shelf from the front but opens to reveal a hidden storage compartment. This floating shelf with hidden drawer shows the finished style to aim for. Build the shelf box from plywood with a drawer that slides out on rails hidden inside the base — perfect for a bedroom nightstand shelf, a bathroom vanity, or a living room display shelf where hidden storage changes how useful the shelf actually is.
Materials Needed:
- Plywood for shelf box and drawer
- Drawer slides
- French cleat for wall mounting
- Wood screws and drill
- Sandpaper and paint or stain
How to Make It:
- Build a hollow rectangular shelf box from plywood with an open base for the drawer.
- Cut a drawer box from plywood sized to fit inside the shelf base with clearance for slides.
- Install drawer slides inside the shelf base and attach to the drawer box.
- Attach a French cleat to the back of the shelf box for wall mounting.
- Mount the cleat into wall studs and hook the shelf onto it — the drawer pulls out from the front.

Floating Shelf with Hidden Drawer
Floating shelf with concealed pull out drawer underneath — adds hidden storage to any room wall.
Check Price on Amazon4. Add a Floating Shelf to the Bathroom Vanity

A floating shelf above the bathroom vanity adds a display and storage surface without a full cabinet. Keep it clean and minimal — soap dispenser, a small plant, a candle — and it reads as intentional styling rather than clutter. This floating shelf bathroom vanity is the right depth for a bathroom shelf and the finish works in both modern and farmhouse bathrooms. Build your own from a cedar or pine board sealed against bathroom moisture and mount above the sink at a comfortable height.
Materials Needed:
- Cedar or pine board (1×6 or 1×8)
- Waterproof wood sealant
- Shelf mounting hardware
- Stud finder and drill
- Level
How to Make It:
- Cut the board to your desired shelf length — typically 24 to 36 inches above a vanity.
- Sand smooth and seal with waterproof sealant for bathroom humidity protection.
- Find studs behind the mounting area and mark positions.
- Mount shelf brackets or a French cleat into studs at the marked height.
- Set the shelf on the brackets and secure before styling with bathroom essentials.

Floating Shelf Bathroom Vanity
Bathroom floating shelf in the right depth for above the vanity — holds essentials without a full cabinet.
Check Price on Amazon5. Build a Kitchen Wall Floating Shelf
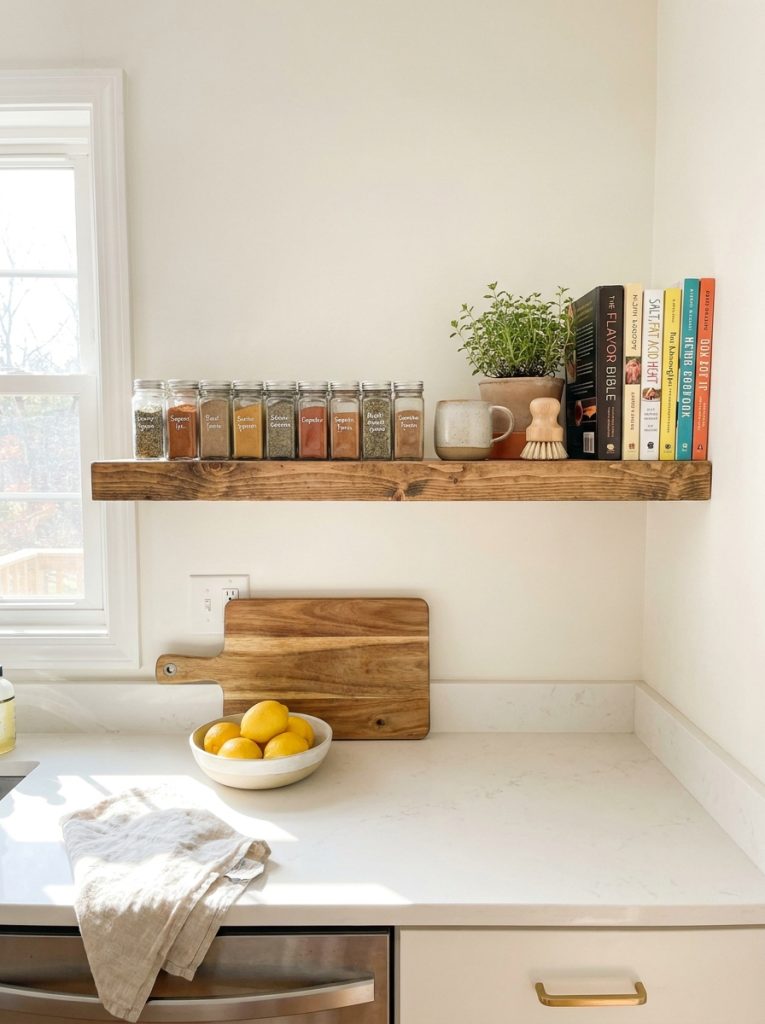
A floating shelf in the kitchen moves spices, oils, and small appliances off the counter and onto the wall where they are just as accessible but take zero counter space. This floating kitchen wall shelf is the right length and depth for a standard kitchen wall. Build your own from a wide pine or oak board sealed with a food-safe finish and mount above the counter or stove. One long shelf above the counter can hold everything that previously crowded the prep surface.
Materials Needed:
- Wide pine or oak board (1×8 or 1×10)
- Food safe wood sealant
- Heavy duty shelf brackets or French cleat
- Stud finder and drill
- Level
How to Make It:
- Cut the board to your desired kitchen shelf length.
- Sand smooth and seal with a food-safe finish for kitchen use.
- Find studs above the kitchen counter area and mark positions.
- Mount brackets or cleat into studs at the desired height.
- Set the shelf in place and load with spice jars and kitchen essentials.

Floating Shelf Kitchen Wall
Kitchen wall floating shelf that moves spices and essentials off the counter without losing accessibility.
Check Price on Amazon6. Build a Floating Nightstand Shelf
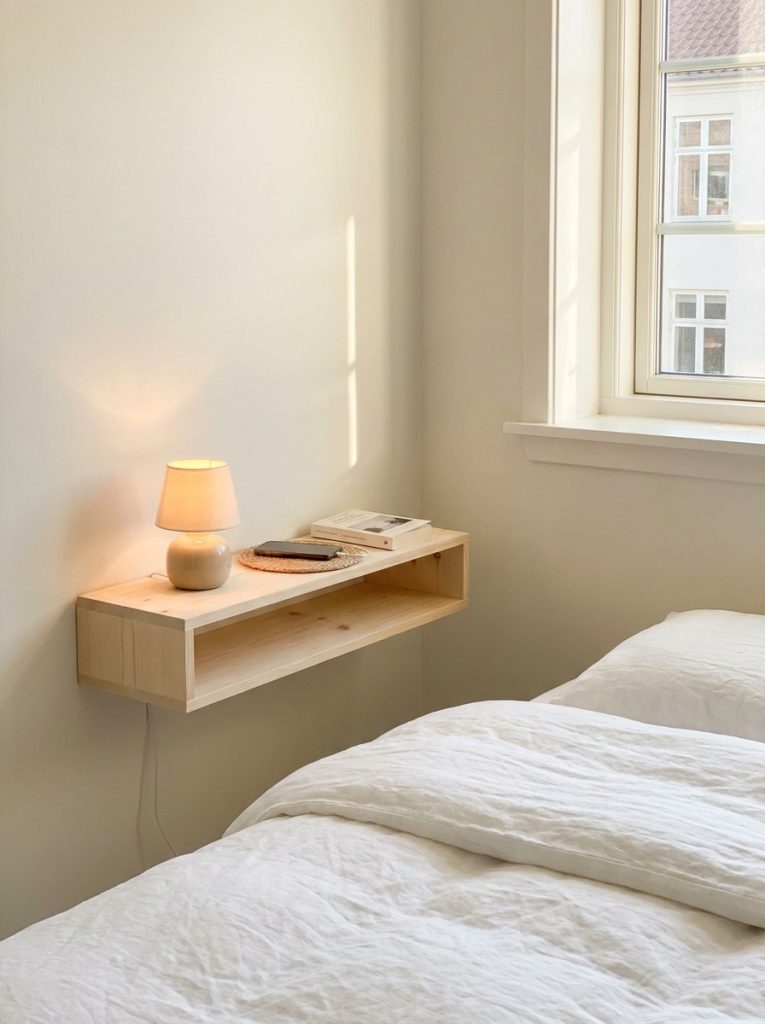
A floating nightstand shelf replaces a freestanding bedside table completely and takes zero floor space. Mount it at the right height beside the bed — lamp, phone, book, water glass all within reach. This floating shelf nightstand bedroom is the right size for a bedside surface. Build your own from a single wide board in a finish that matches the bedroom furniture and mount directly to the wall beside the bed. For more bedroom ideas check out these bedside storage ideas.
Materials Needed:
- Wide board (1×10 or 1×12 cut to 16 to 20 inches)
- Heavy duty shelf brackets or hidden mounting hardware
- Stud finder and drill
- Sandpaper and wood finish
- Level
How to Make It:
- Cut the board to your desired nightstand size — typically 16 to 20 inches square.
- Sand and finish to match the bedroom furniture.
- Mount at the right bedside height — typically 24 to 28 inches from the floor.
- Use hidden mounting hardware for a truly floating look with no visible brackets.
- Style with a small lamp, phone charger, and bedside essentials.

Floating Shelf Nightstand Bedroom
Wall mounted floating nightstand that replaces a bedside table without using any floor space.
Check Price on Amazon7. Add a Floating Shelf Above the Washer and Dryer
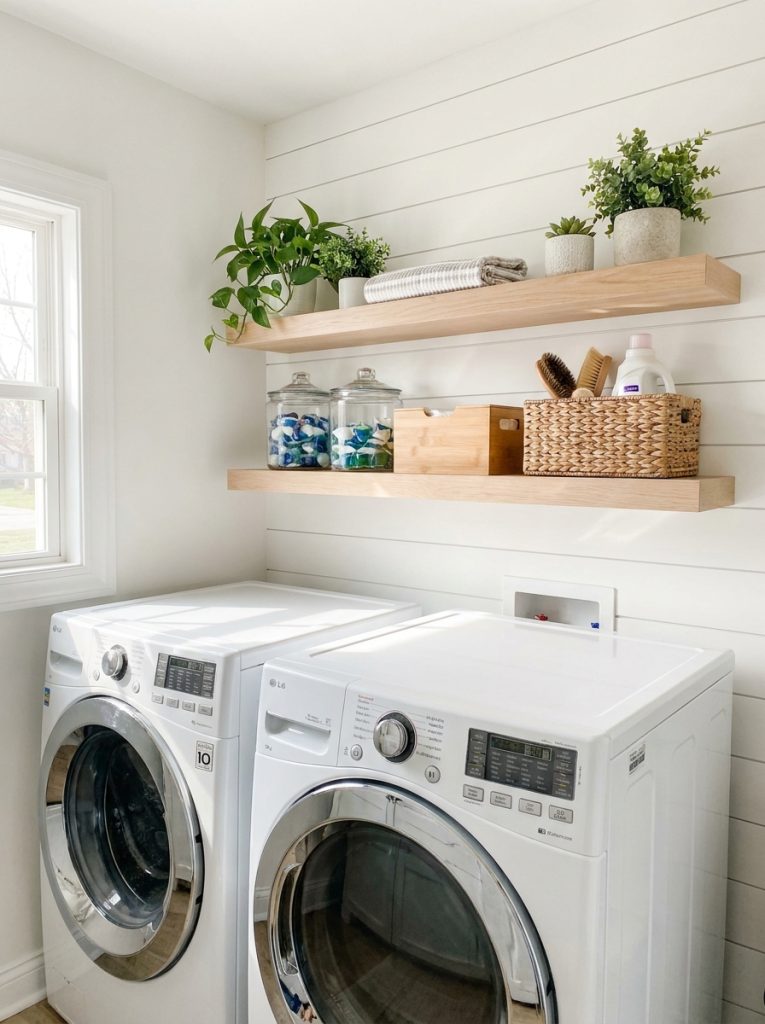
A floating shelf above the washer and dryer is one of the most useful laundry room upgrades available. It holds detergent, dryer sheets, stain remover, and other supplies at a convenient height without taking any floor space. This floating shelf laundry room is sized to span across a standard washer-dryer pair. Build your own from a single wide board at the right length and mount into the wall studs above the machines — the shelf should sit high enough that the dryer door clears it fully when open.
Materials Needed:
- Wide board (1×12 cut to washer-dryer width)
- Heavy duty shelf brackets
- Stud finder and drill
- Sandpaper and paint or sealant
- Level
How to Make It:
- Measure the combined width of the washer and dryer and add a few inches on each side.
- Cut the board to that length and finish with paint or sealant.
- Mark stud positions on the wall above the machines.
- Mount brackets into studs at a height that allows the dryer door to open freely below.
- Set the shelf on the brackets and load with laundry supplies.

Floating Shelf Laundry Room
Laundry room floating shelf that spans above washer and dryer for convenient supply storage at reach height.
Check Price on Amazon8. Build a Floating Shelf for a Kids Room
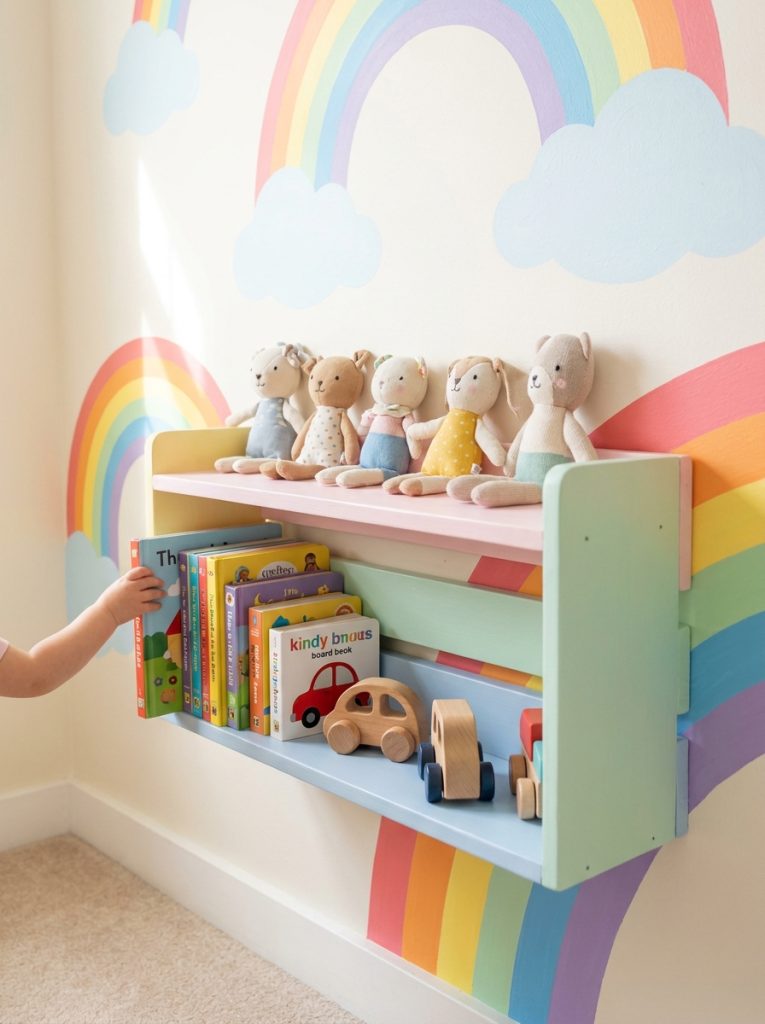
A floating shelf in a kids room at the right height gives children their own display and storage space that they can access and manage independently. Mount at a height the child can reach to put things away themselves. This floating shelf kids room is the right size for small toys, books, and display items. Paint the shelf in a color that matches the room or the child’s favorite color for a personalized touch that makes it feel like their own special space.
Materials Needed:
- 1×8 or 1×10 board cut to desired length
- Shelf mounting hardware
- Colorful paint
- Stud finder and drill
- Level
How to Make It:
- Cut the board to your desired length — 24 to 36 inches works well for a kids shelf.
- Paint in a fun color that suits the room and allow to dry fully.
- Mount at a height the child can comfortably reach — typically 3 to 4 feet from the floor.
- Secure into wall studs with heavy duty brackets hidden inside a shelf box if desired.
- Let the child arrange their own books and toys on it for ownership of the space.

Floating Shelf Kids Room
Kids room floating shelf at child-accessible height for books, small toys, and personal display items.
Check Price on Amazon9. Build an Easy Budget Floating Shelf
The cheapest floating shelf you can build is a single pine board cut to length, sanded, painted, and mounted with two brackets. The whole project costs under fifteen dollars and takes about an hour including drying time. The key to a budget shelf that looks expensive is the finish — sand through multiple grits, prime before painting, apply two coats, and the cheap pine board looks indistinguishable from a shelf that cost ten times as much. Start with one and add more as confidence grows.
Materials Needed:
- 1×6 or 1×8 pine board
- Two shelf brackets
- White paint and primer
- Sandpaper — 80, 120, 220 grit
- Drill and wall anchors
How to Make It:
- Cut pine board to desired length — any length works.
- Sand through 80, 120, and 220 grit for a smooth paintable surface.
- Apply primer and two coats of white paint allowing to dry between each.
- Mount two brackets into wall studs at the desired height.
- Set the board on the brackets and secure with screws from below.
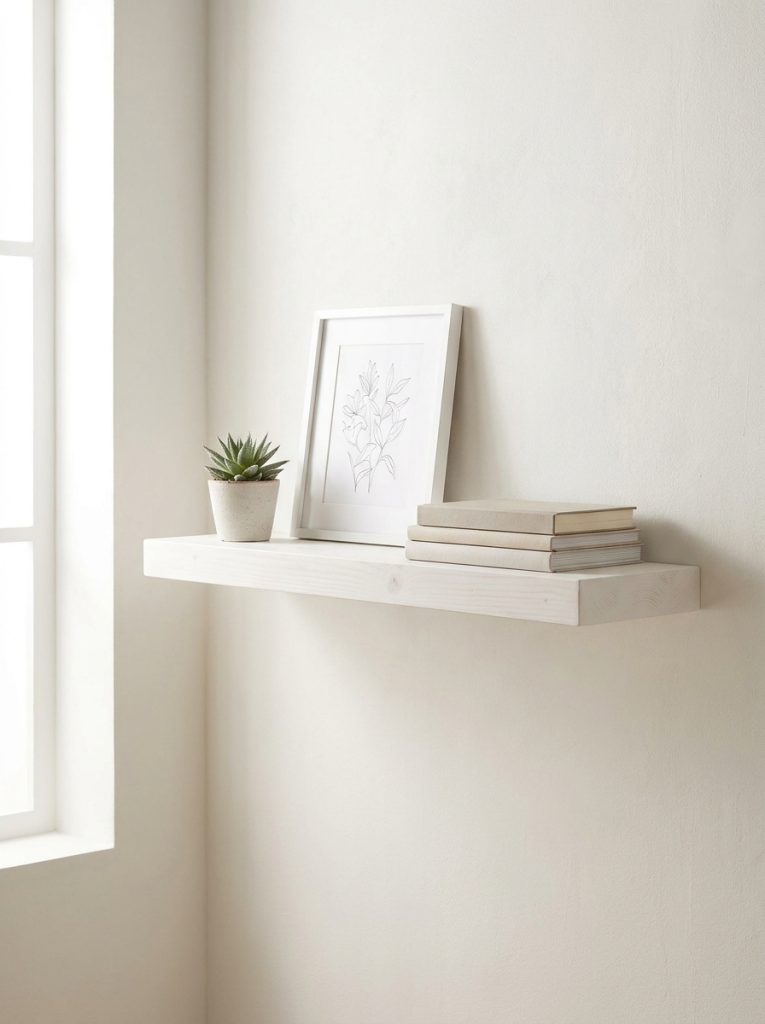
10. Build a Floating Shelf for a Small Space

Small spaces need shelves that use wall space without adding any bulk to the floor. A single floating shelf in a narrow hallway, above a small desk, or in a tiny bedroom corner adds real storage without making the space feel smaller. Keep the shelf depth proportional to the wall — a narrow hallway needs a shallower shelf than a bedroom wall. Style with just a few items to keep the small space feeling open rather than cluttered.
11. Build a Living Room Display Shelf
A living room floating shelf is as much about styling as it is about storage. Build a slightly deeper shelf — 10 to 12 inches — so there is room to layer items in front of and behind each other. Style with odd numbers of objects, varying heights, and a mix of book spines, small plants, and decorative objects. The shelf becomes a focal point of the room rather than just a storage surface. For more living room shelf ideas check out these shelf styling ideas.
12. Build a Floating Desk Shelf
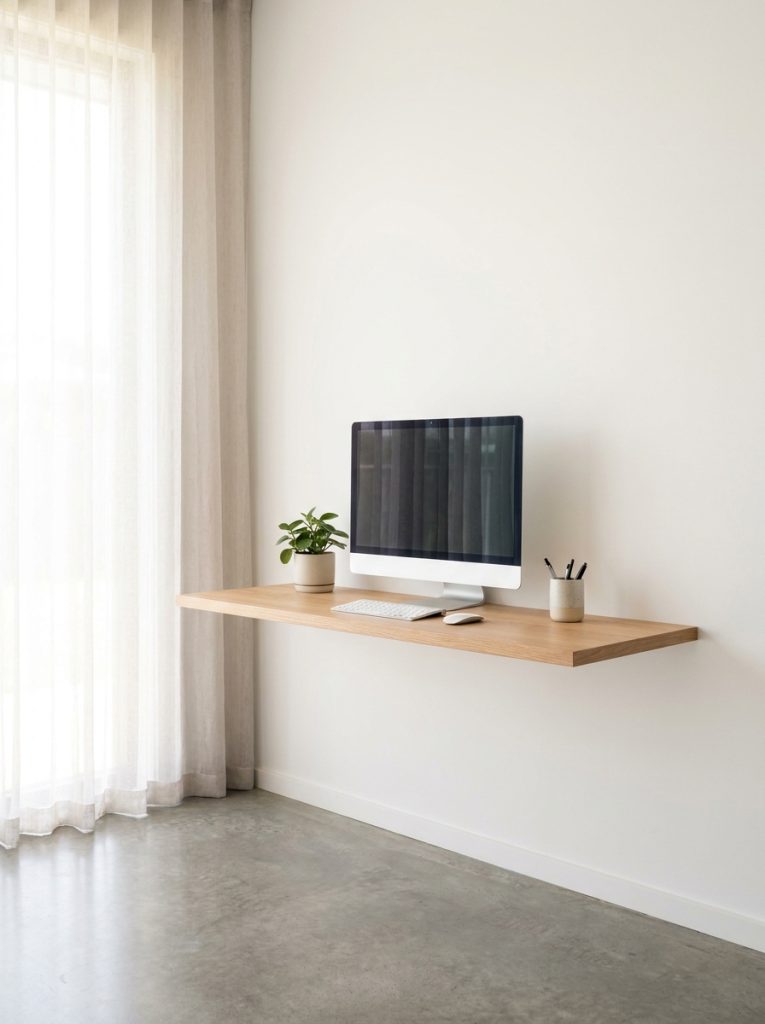
A floating desk shelf mounts to the wall at desk height and creates a full work surface with zero floor footprint. It works especially well in home offices in small spaces — a bedroom corner, a closet office, or a hallway nook. Build from a wide thick board — at least 1.5 inches thick for rigidity across a desk-length span — and mount with heavy duty brackets into studs. The wall below the desk stays completely clear which makes the small office space feel dramatically more open.
13. Build a Floating Vanity Shelf
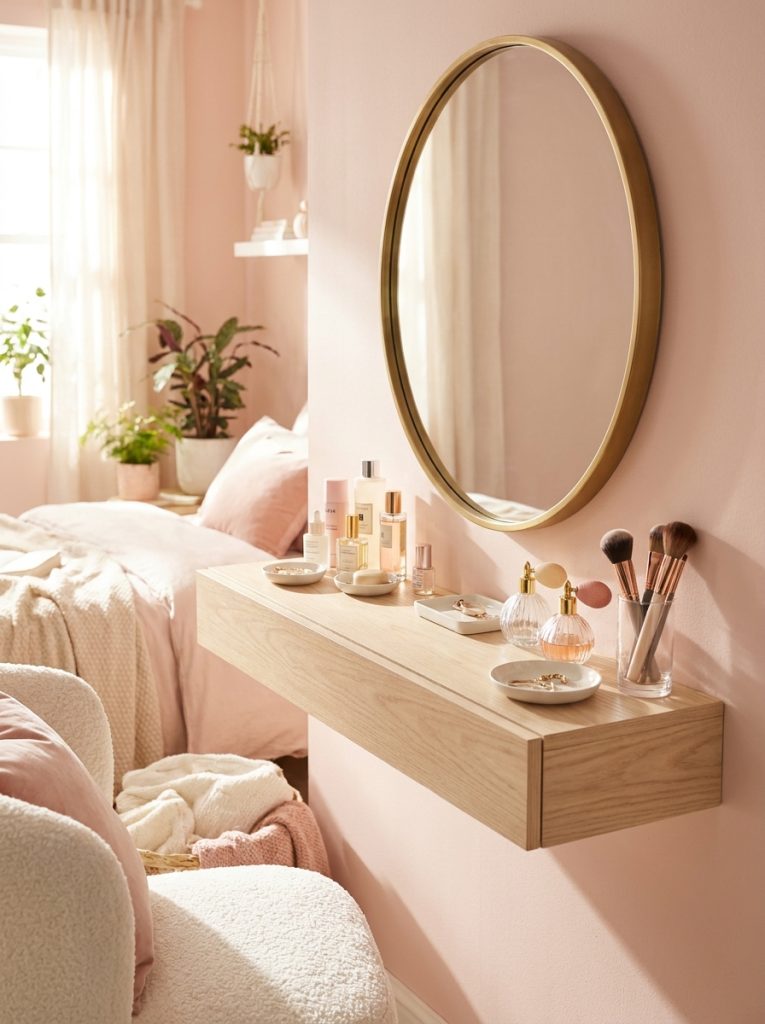
A floating vanity shelf in the bedroom creates a dedicated beauty station without a full vanity table taking up floor space. Mount a wide shelf at a comfortable seated height, hang a mirror above it, and add a stool below — the whole setup functions as a proper vanity in the footprint of a single shelf. Style with perfumes, small plants, and beauty essentials for a display that looks curated and intentional every morning.
14. Build a Cardboard Floating Shelf for Renters

A cardboard floating shelf built from layered honeycomb cardboard panels and mounted with command strips is the ultimate renter-friendly shelf — it adds a shelf to any wall without drilling a single hole and comes down clean at the end of the lease. Layer four to six sheets of honeycomb cardboard, glue together, coat with gesso and paint, and mount with large command strips rated for the weight. Best for lightweight decorative items rather than heavy loads.
15. Build a Hidden Storage Floating Shelf
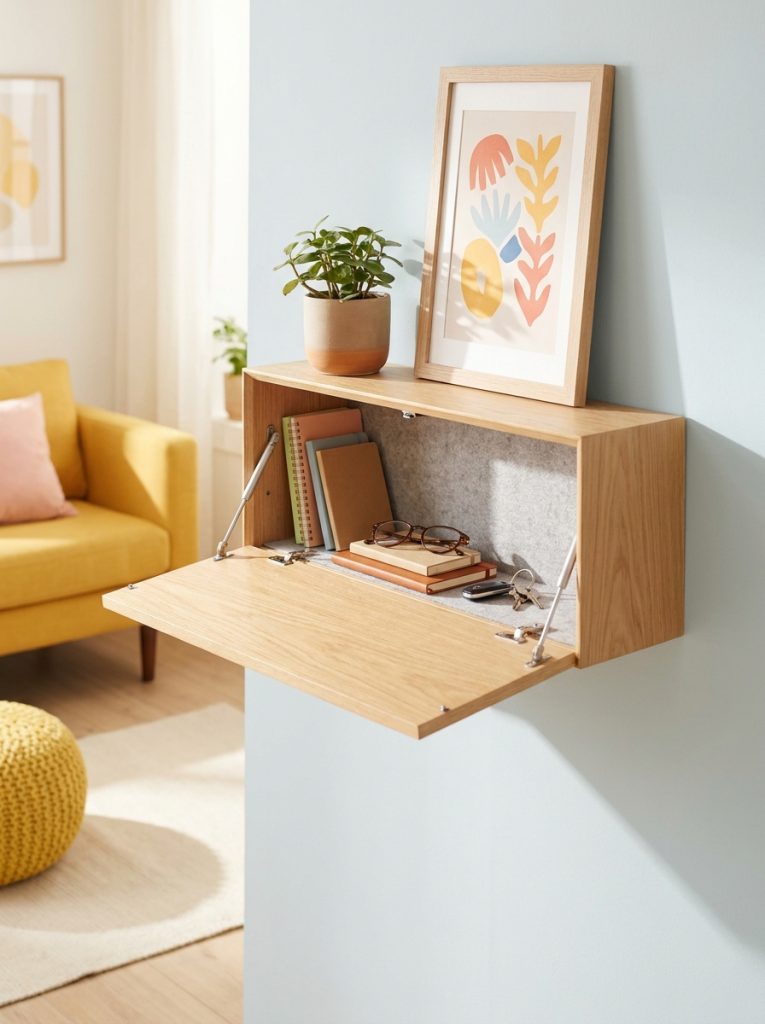
A floating shelf with a hidden compartment inside the shelf body looks like a plain decorative shelf from the front but opens to reveal storage for valuables, charging equipment, or important documents. Build the shelf as a hollow box, add a hinged front panel that opens downward or sideways, and install a push-to-open magnetic catch so nothing is visible from outside. These DIY room decor ideas have more creative hidden storage projects to pair with a hidden shelf build.
Materials Needed:
- Plywood for shelf box
- Piano hinge for hidden door
- Push-to-open magnetic catch
- French cleat for wall mounting
- Sandpaper and paint
How to Make It:
- Build a hollow rectangular shelf box from plywood with a flat front panel.
- Score the front panel and attach it as a hinged door on the bottom edge with a piano hinge.
- Install a push-to-open magnetic catch so the door pops open with a press.
- Attach a French cleat to the back of the shelf box for wall mounting.
- Mount the cleat into wall studs and hook the shelf onto it.
Final Thoughts on DIY Floating Shelf
A floating shelf is one of the most rewarding DIY projects because the result is immediately visible and useful. Whether you build a simple budget shelf for fifteen dollars, a hidden drawer shelf for the bedroom, or a full kitchen wall of floating shelves, the process is the same — cut, finish, mount, style. Pick the room where you need storage most and start with one shelf this weekend.

Amir Ali is the founder and site administrator of HomeDecorEdge, a modern home decor and interior design platform. Since starting the site, he has combined his passion for interior design, practical styling, and color coordination with hands-on content strategy and site management. He guides authors, curates high-quality articles, and ensures readers have access to actionable, visually inspiring, and user-focused home decor advice for apartments, small rooms, and family homes.