

Pine cones might be the friendliest Christmas material of all. They are free in most yards and parks, they last for years, and their warm brown scales make every room feel a little more woodland and cozy. If you have a bag of cones collected on a walk, you already have the start of a wreath, a garland and a handful of ornaments.

Before any crafting, clean your cones first. Shake off loose dirt, soak them in a sink of water with a splash of white vinegar for about 30 minutes, then bake them on a foil lined tray at 200 degrees Fahrenheit for about 30 minutes until the scales open and dry out. Let them cool completely before you touch them, and never leave the oven unattended while they bake.
This list mixes three full step by step builds with simple styling ideas you can copy in minutes. Some are sweet crafts to make with kids, and others are quiet decor touches for the mantel, the table and the front door.
Pick one or two favorites, gather your cones, and start with clean, dry scales. Every idea here works with cones you find outside, so the prettiest decor in your home this Christmas may cost you nothing at all.
Quick Picks
- Best front door impact: Rustic Pine Cone Christmas Wreath (idea 1)
- Easiest for beginners: Mini Pine Cone Christmas Tree (idea 3)
- Cutest for kids: Pine Cone Owl Craft (idea 10)
1. Rustic Pine Cone Christmas Wreath
BuildAbout 45 minutesBeginner friendly
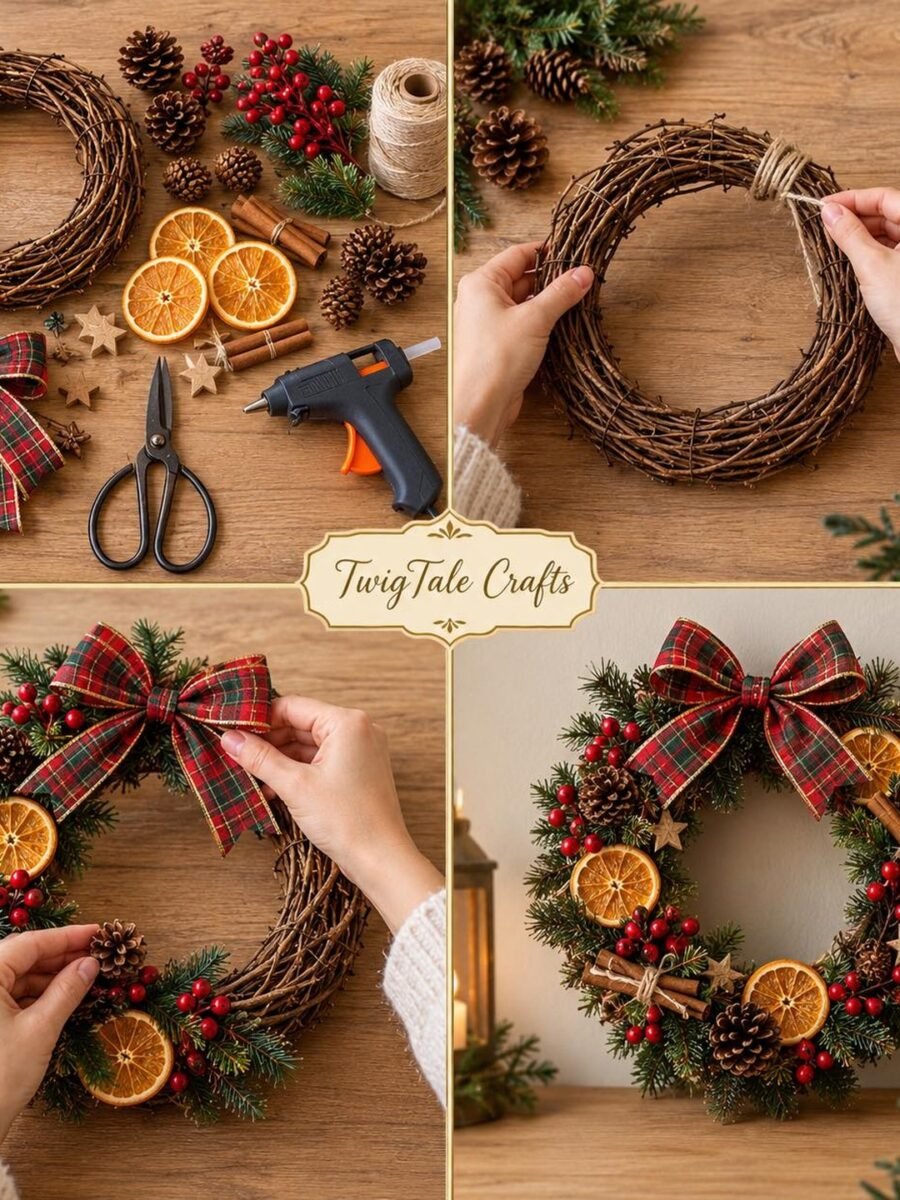
A twig wreath base does most of the work in this build, so the finished wreath looks full and layered without any wiring skills. Pine cones, berries and dried orange slices bring the color, and a plaid bow finishes it like a bow on a present.
Materials Needed
- About 20 cleaned pine cones in mixed sizes
- Grapevine or twig wreath base, 12 to 14 inches
- Evergreen sprigs, real or faux
- Red berry picks
- Dried orange slices and cinnamon sticks
- Plaid ribbon for a bow
- Jute twine
- A full size hot glue gun kit with glue sticks
- Scissors
How to Make It
- Clean and bake your pine cones first, then let them cool fully so the scales sit open and dry.
- Wrap a loop of jute twine around the top of the wreath base and knot it well for hanging.
- Lay evergreen sprigs all the way around the base, pointing in one direction, and glue the stems down.
- Glue the largest pine cones first, spacing them evenly around the ring.
- Fill the gaps with smaller cones, berry picks, orange slices and cinnamon sticks.
- Tie a plaid bow and glue or wire it at the top of the wreath.
- Hang the wreath on a front door or wall, ideally in a sheltered spot if it goes outdoors.
Tip: Sort your cones into big and small piles before you start gluing. Big cones anchor the design, and the small ones are perfect for filling the little gaps at the end.
2. Pine Cone Gnome Ornaments
BuildAbout 20 minutes eachGreat with kids
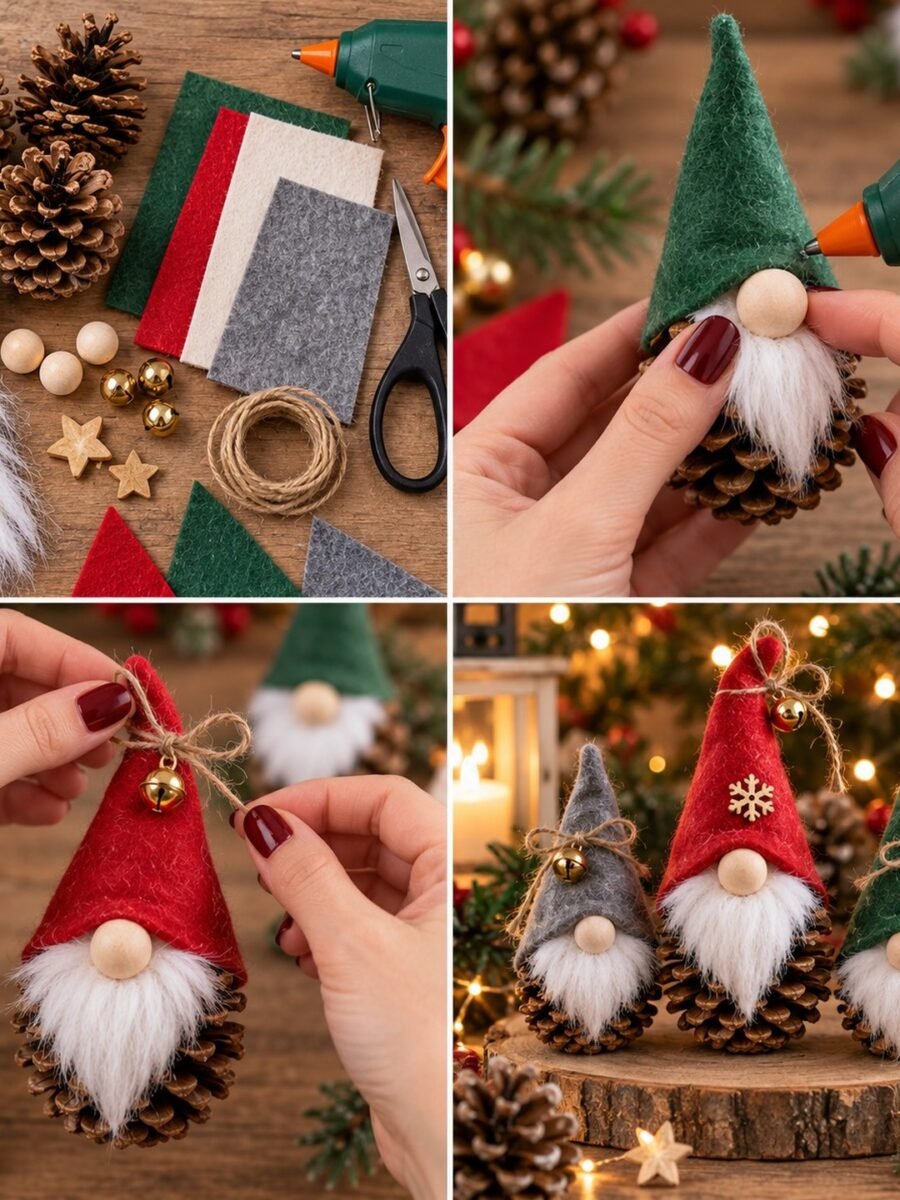
These little gnomes turn a plain pine cone into a character with a tall felt hat and a fluffy beard. They hang happily on the tree, and a whole set in different hat colors looks like a tiny gnome family.
Materials Needed
- Medium pine cones, cleaned and dried
- Felt sheets in red, green, white and gray
- White yarn or cotton batting for beards
- Small wooden beads for noses
- Jute twine for hanging loops
- Hot glue gun and glue sticks
- Scissors
How to Make It
- Cut a triangle of felt and roll it into a tall cone hat, gluing the seam closed.
- Glue a strip of white yarn or a small wad of cotton around the upper third of the pine cone for the beard.
- Glue a wooden bead right above the beard as the nose.
- Set the felt hat on top so it covers the top of the beard, and glue it in place.
- Glue a short loop of twine inside the hat for hanging.
- Repeat with different hat colors to build a whole gnome family for the tree.
Tip: Let kids choose the hat colors and nose sizes. Slightly wonky gnomes have the most charm, and no two will ever match.
3. Mini Pine Cone Christmas Tree
BuildAbout 15 minutesEasiest build
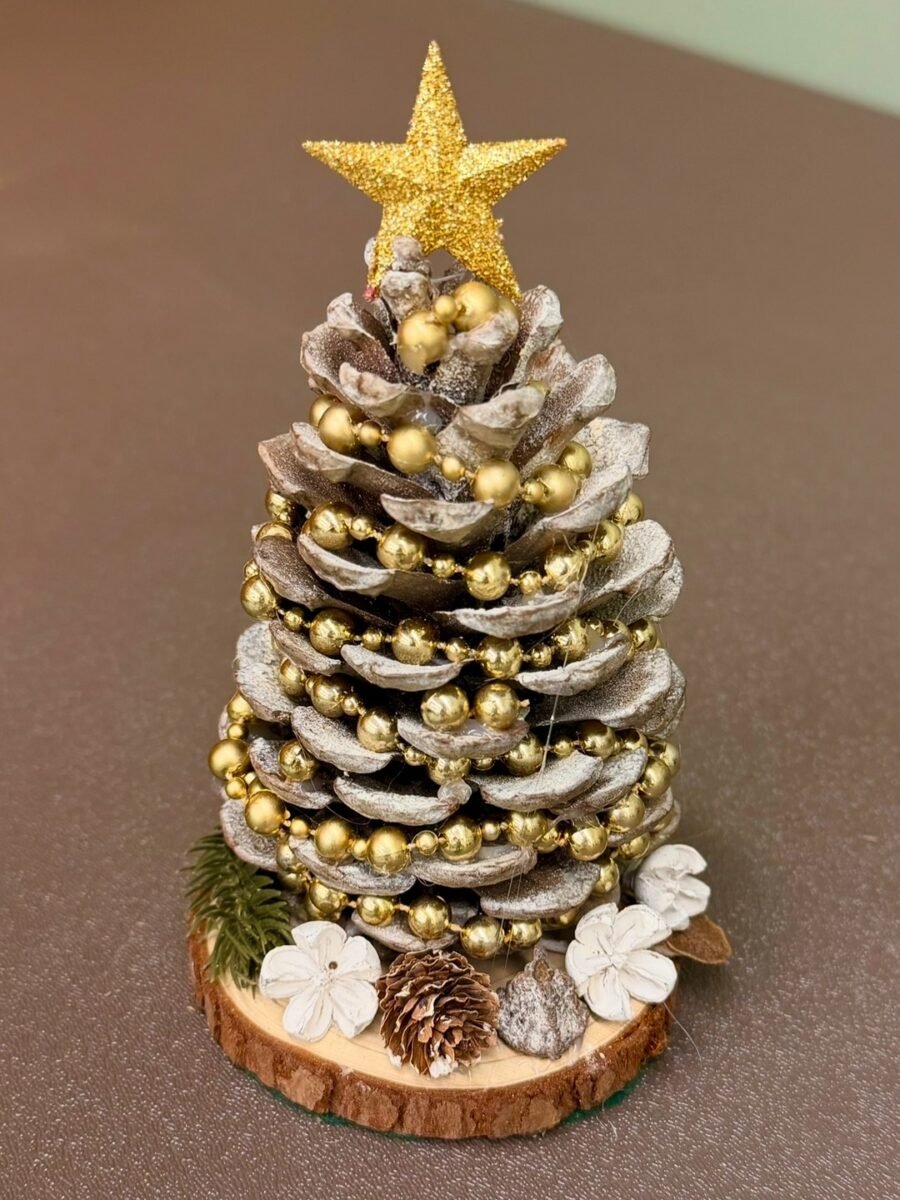
One big, open pine cone already has the shape of a tiny Christmas tree. A little white paint on the tips looks like fresh snow, and a strand of gold beads becomes the garland. It is the fastest build on this list and a sweet gift, too.
Materials Needed
- One large, open pine cone per tree
- Small terracotta pot, cork or wood slice base
- White acrylic paint, from a 24 color acrylic paint set or any craft paint you own
- Thin gold bead garland
- A tiny star for the top
- Hot glue gun and glue sticks
- Small dry paintbrush
How to Make It
- Glue the pine cone upright onto its base and let the glue set fully.
- Dip a dry brush in white paint, wipe most of it off, and brush only the outer tips of the scales for a snowy look.
- Wrap the gold bead garland gently around the cone from bottom to top.
- Glue the tiny star on the very top point of the cone.
- Set the tree on a shelf, windowsill or desk and enjoy your tiny forest.
Tip: A dry brush is the secret. Too much paint covers the natural brown, and the snowy effect comes from catching just the edges of each scale.
Printable Bundle
Christmas Printable Bundle
Christmas planner, 24 advent activity cards, 36 gift tags, handmade labels, Santa letter and family games.
4. Pine Cone Angel Ornament
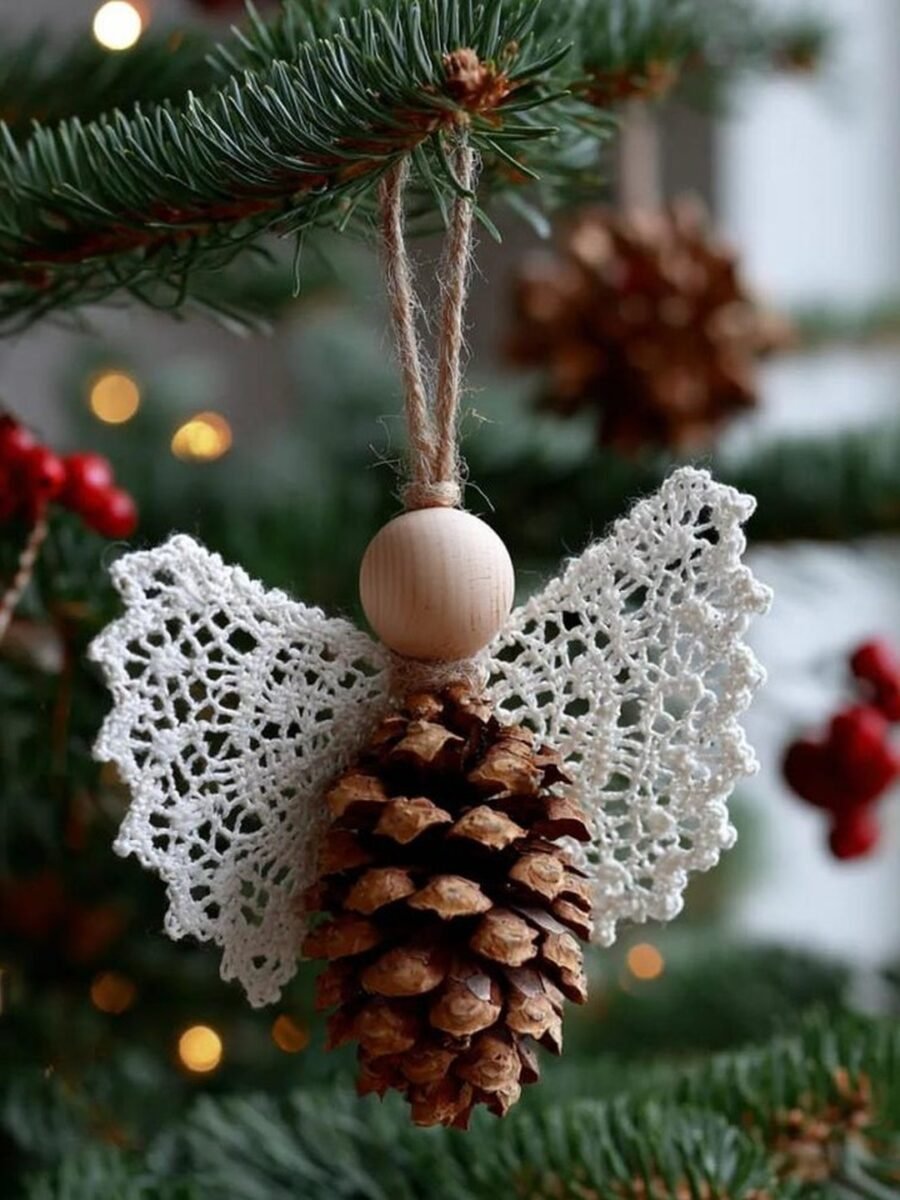
A pine cone body, a smooth wooden bead head and delicate white wings make an angel that feels gentle and handmade. It looks lovely on the tree, and it also works as a sweet topper on a wrapped gift for someone who loves natural decor.
You’ll need: one pine cone, a wooden bead, white lace or a small doily for wings, twine and glue.
Best for: Tree ornaments and gift toppers
5. Snowy Pine Cone Reindeer

This little deer uses a snow dusted pine cone for the body, twig legs and a soft felt head. Set it on a shelf or the Christmas table and it brings a calm woodland feeling to the room. Kids love giving each reindeer a different colored nose or scarf.
You’ll need: a large pine cone, white paint, twigs, felt, a red pom pom and glue.
Best for: Kids craft afternoons and shelf decor
6. Mantel Garland with Pine Cones and Gold Baubles
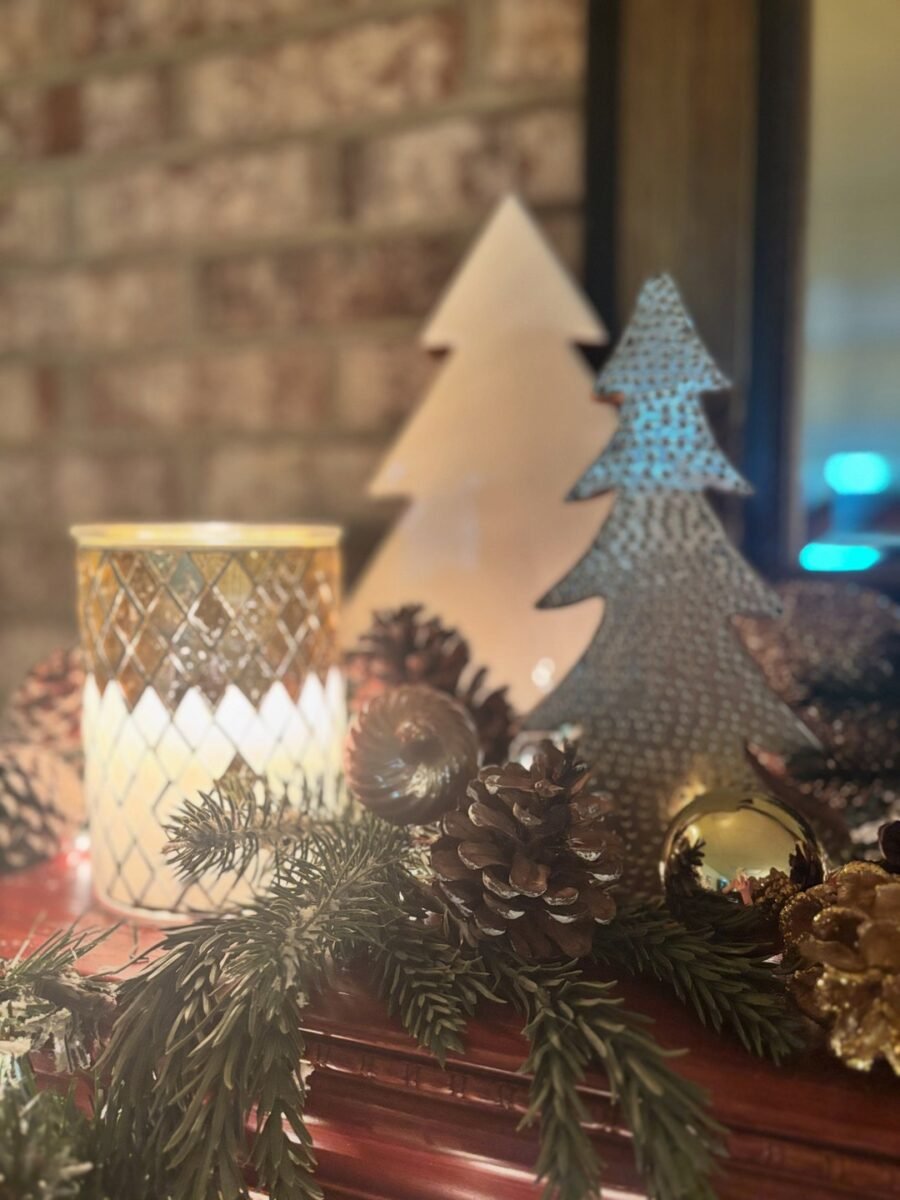
The fastest way to dress a mantel is to lay a green garland along it and tuck pine cones and a few gold baubles into the branches. The cones add texture, the gold adds glow, and the whole thing takes minutes. Keep garlands and cones well away from open flames, and choose flameless candles for the mantel instead of real ones.
You’ll need: an evergreen garland, pine cones, gold baubles and a ribbon or two.
Best for: Fireplace mantels and shelves
7. Painted Pine Cone Zinnia Flowers
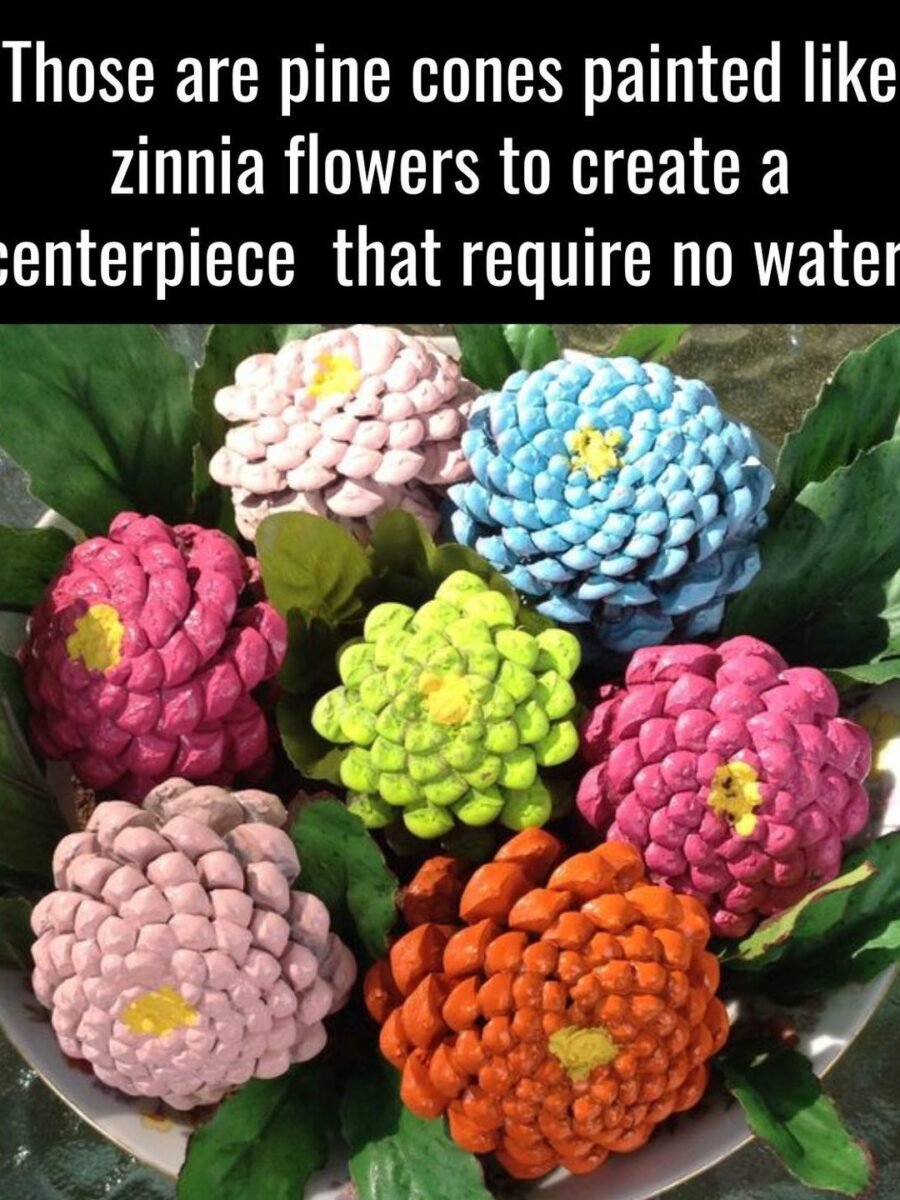
Cut a pine cone flat at the base and it opens up like a zinnia flower. Painted in pink, coral and yellow, a row of these cheerful blooms in a low bowl or vase makes a centerpiece that never needs water and never wilts before Christmas dinner.
You’ll need: pine cones with flat bases, bright acrylic paints, a small saw or strong clippers and a bowl or vase.
Best for: Colorful table centerpieces

Printable Games
Christmas Party Games Pack
9 fun games for family, friends and office parties: trivia, charades, gift swap and more.
8. Painted Pine Cone Wreath in Red and Gold
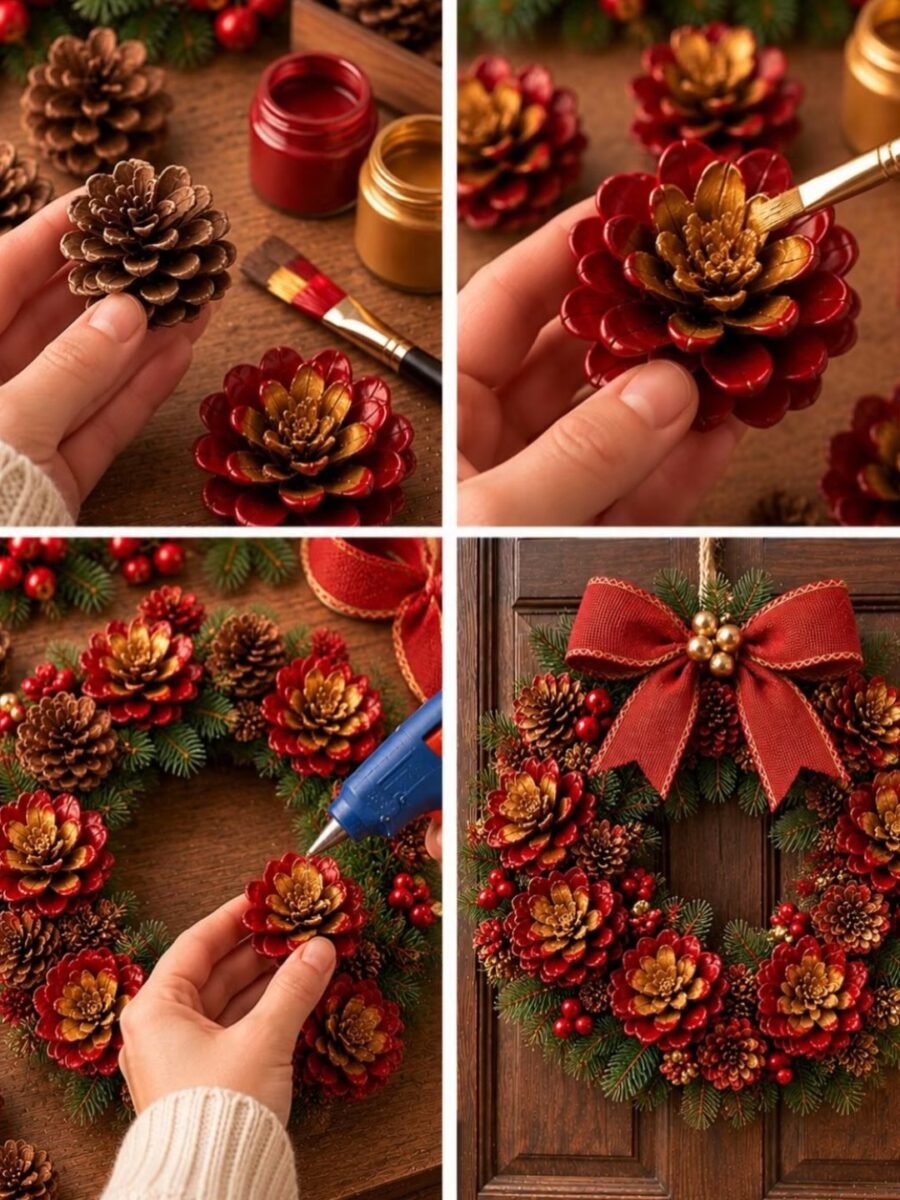
If you love a classic red and gold door, paint the outer scales of small cones deep red and touch the centers with gold. Glued onto a greenery wreath with berries and a big red bow, the painted cones catch the light and look far more expensive than they are.
You’ll need: small pine cones, red and gold acrylic paint, a wreath base, faux berries, ribbon and hot glue.
Best for: Front doors and entryways
9. Winterberry and Pine Cone Vase Centerpiece

A clear glass vase filled with red winterberry branches does the hard work here. Evergreen sprigs soften the stems, pine cones sit inside the vase and around its base, and a rustic wood slice underneath grounds the whole arrangement on the table.
You’ll need: a clear glass vase, winterberry branches, evergreen sprigs, pine cones and a wood slice.
Best for: Dining tables and coffee tables
10. Pine Cone Owl Craft
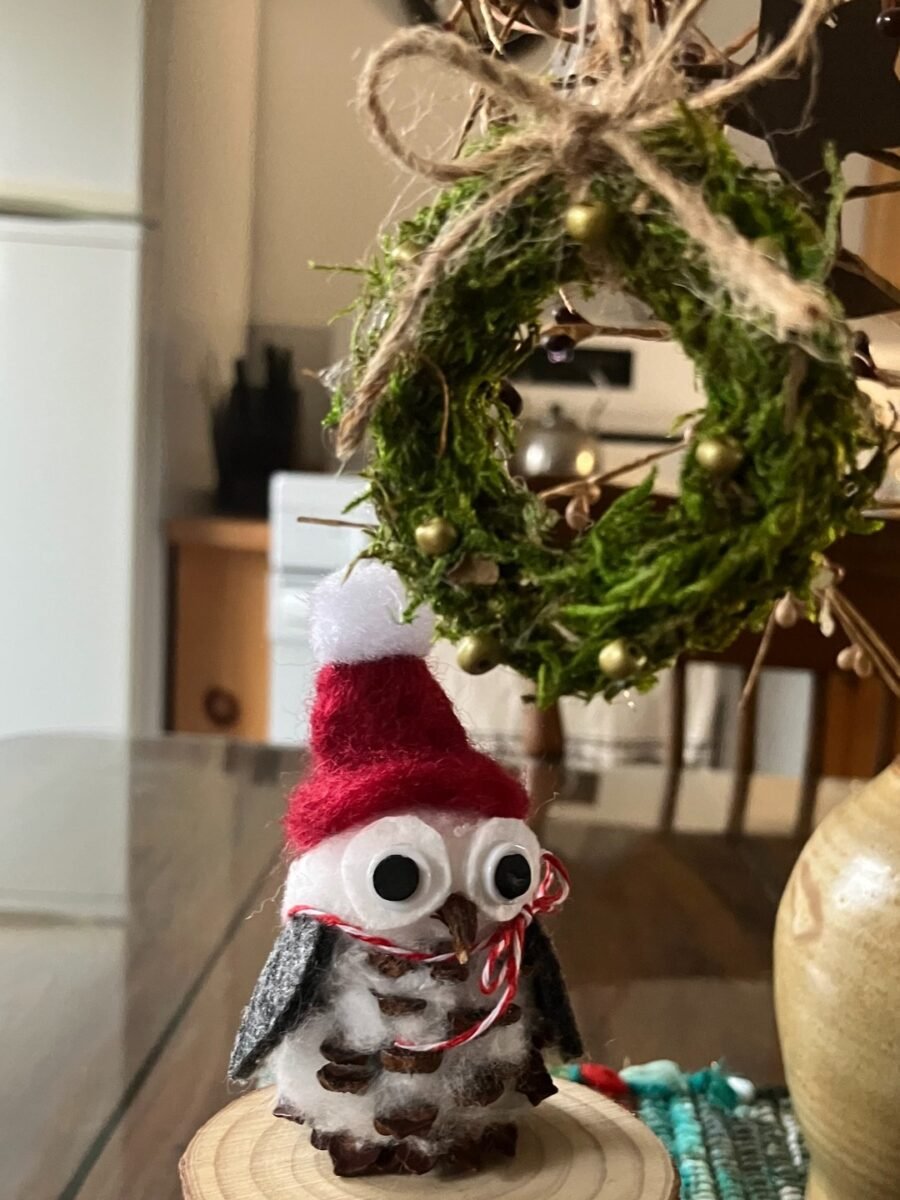
A pine cone covered in soft white fluff, with big round eyes, becomes an owl that children adore. It takes patience to tuck the fluff between the scales, but the result is a woodland friend that can sit on the tree skirt, a bookshelf or a child bedroom shelf all winter.
You’ll need: a pine cone, white cotton or felt, felt or button eyes, a tiny felt beak and glue.
Best for: Kids crafts and woodland themes
11. Pine Cone Trees in Terracotta Pots
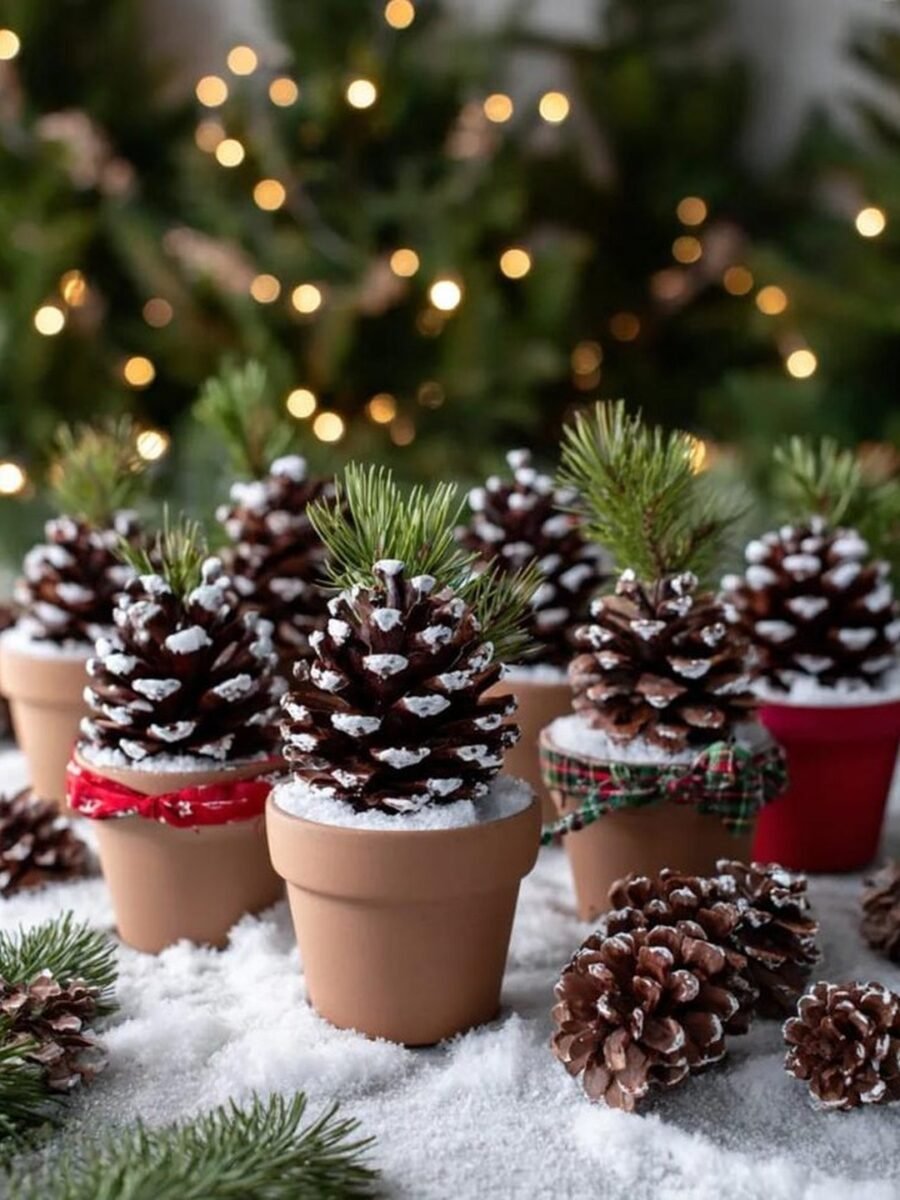
A row of little terracotta pots, each holding one snow dusted pine cone, makes the sweetest windowsill display. The pots give the cones height and a finished look, and a dusting of fake snow ties the whole row together. Line up three, five or seven for the best effect.
You’ll need: large pine cones, small terracotta pots, white paint or fake snow and glue.
Best for: Windowsills and sheltered porch steps
12. Pine Cone Tree with Pearl Details
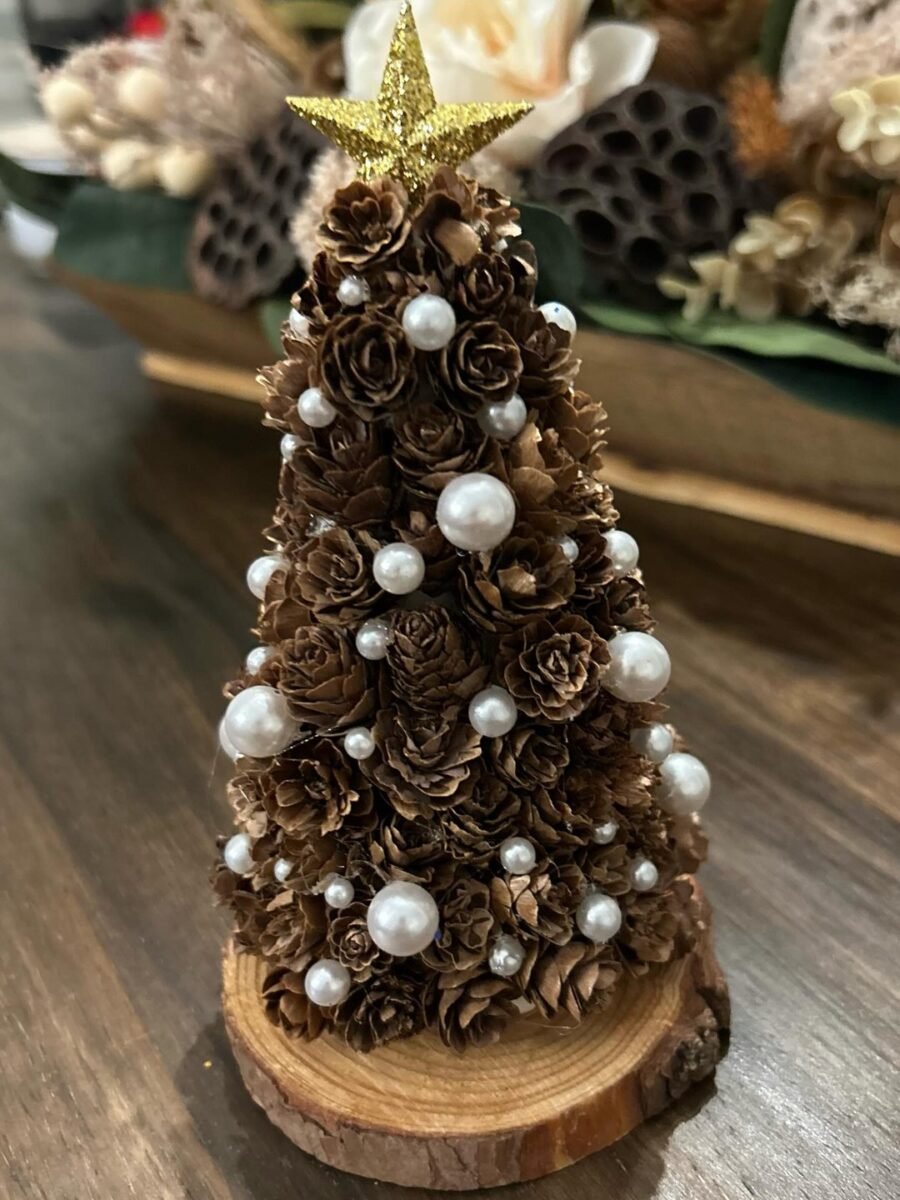
Instead of one cone, this tree is built from dozens of small pine cones layered into a cone shape, with white faux pearls tucked between them like tiny baubles. It has a rich, detailed look that suits a side table or a mantel corner where guests can admire it up close.
You’ll need: many small pine cones, a cone shaped foam or cardboard form, faux pearl beads and hot glue.
Best for: Side tables and mantel corners
Frequently Asked Questions
How do you clean pine cones before crafting?
Shake off loose dirt, soak the cones in water with a splash of white vinegar for about 30 minutes, then bake them on a foil lined tray at 200 degrees Fahrenheit for about 30 minutes. The heat dries them, opens the scales and removes sap and any tiny bugs. Let them cool completely before crafting, and never leave the oven unattended.
How long do pine cone decorations last?
Cleaned and dried pine cones last for years. Store finished pieces in a dry box with tissue between layers, and keep painted or glued pieces away from damp rooms. A quick dust with a soft brush each season is all they need.
Can pine cone decor go outdoors?
Yes, in sheltered spots like a covered porch. Rain makes the scales close up and can loosen glue, so bring wreaths and crafts inside during wet weather, or hang them where a roof keeps them mostly dry.
Are pine cones safe around pets and small children?
Plain, cleaned cones are a natural material, but they are decor, not food, and small pieces can break off. Keep painted, glittered or glued pieces out of reach of pets and toddlers, and always supervise children during craft time, especially around hot glue.
Why do pine cones close up when they get wet?
Pine cone scales move with moisture. They close when wet to protect the seeds inside and open again as they dry. If a finished craft closes up, a short rest in a warm, dry room or a few minutes of gentle oven heat at a low setting will open the scales again.
What glue works best on pine cones?
Hot glue is the strongest and fastest choice for cones because it grips the rough scales well. Use a low temperature glue gun for crafts with children, and let an adult handle the gluing steps for heavy pieces like wreaths.
Final Thoughts on Pine Cones Christmas Ideas
Pine cones ask for so little and give so much. A walk in the park, a warm oven and a glue gun can turn into a wreath for the door, gnomes for the tree and a mantel that smells like a winter forest.
Start with one idea from this list, clean your cones well, and let the natural shapes guide you. The small flaws and uneven scales are exactly what make pine cone decor feel warm, real and handmade.

