

Salt dough is the Christmas craft that never goes out of style. Flour, salt and water turn into sturdy ornaments that kids can roll, cut, press and paint, and a good batch becomes the keepsakes families hang on the tree for decades.

One rule matters before anything else: salt dough ornaments are NOT edible. They look like cookies, but the dough is packed with salt and must never be eaten by children or pets. Set them up as craft only, keep finished ornaments out of reach of pets, and wash little hands after making them.
The basic recipe is simple: 2 cups of plain flour, 1 cup of fine salt and about three quarters of a cup of water, kneaded until smooth. Roll it about a quarter inch thick, cut or press your shapes, add a hanging hole with a straw, then bake low and slow or air dry for two to three days.
This list starts with three full builds: classic cookie cutter ornaments, a handprint Santa, and fingerprint Christmas trees. After that come keepsakes, snowmen, painted sets and a few sweet extras, all with the same humble dough.
Quick Picks
- Best first project: Classic Cookie Cutter Salt Dough Ornaments (idea 1)
- Best keepsake: Handprint Santa Salt Dough Ornament (idea 2)
- Best for toddlers: Fingerprint Christmas Tree Ornaments (idea 3)
1. Classic Cookie Cutter Salt Dough Ornaments
BuildBaking day projectBeginner friendly
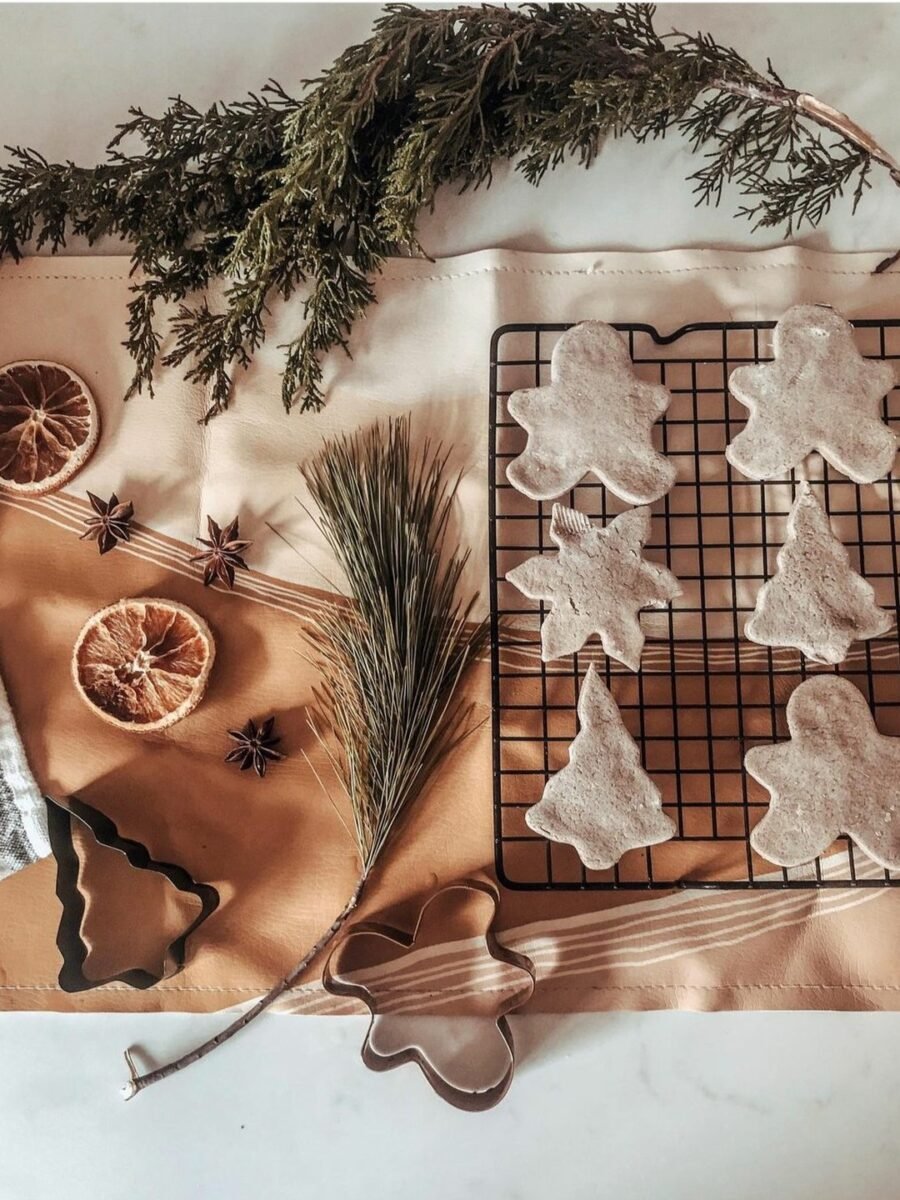
This is the master build every other idea on the list grows from. Mix one batch, roll it out, and press or cut snowflakes, gingerbread men, stars and candy canes. Bake them until hard, cool them fully, then paint and seal. Remember throughout: these are decorations only and are not edible.
Materials Needed
- 2 cups plain flour
- 1 cup fine table salt
- About 3/4 to 1 cup warm water
- Rolling pin and parchment paper
- A Christmas cookie cutter set with 18 holiday shapes
- A straw or skewer for hanging holes
- Acrylic paints and brushes
- Mod Podge matte sealer for the finish
- Twine or ribbon for hanging
How to Make It
- Stir the flour and salt together, add the water a little at a time, and knead for about 5 minutes until the dough is smooth and firm, like play dough.
- Roll the dough on parchment to about a quarter inch thick. Thicker pieces puff and crack more, so keep it even.
- Cut shapes with cookie cutters, or press textures and stamps into the surface.
- Poke a hanging hole at the top of each ornament with a straw before baking. Holes added later will crack the dough.
- Bake at 250 degrees Fahrenheit until hard, about 2 to 3 hours depending on thickness, turning once halfway. Or air dry on a rack for 2 to 3 days.
- Cool completely, then paint. Let the paint dry fully.
- Brush on a coat of sealer, let it dry, thread twine through the holes and hang.
Tip: If the dough feels sticky, knead in flour one spoon at a time. If it cracks while rolling, add water a spoon at a time. The dough should feel like soft play dough, never wet.
2. Handprint Santa Salt Dough Ornament

BuildKids keepsakeAbout 30 minutes plus baking
A small hand pressed into dough becomes Santa himself. The fingers turn into his white beard, the palm becomes his face, and a red hat at the top finishes the joke. Grandparents melt over these, and they are the ornaments families reach for first every year.
Materials Needed
- One batch of salt dough from idea 1
- Rolling pin and parchment paper
- A straw for the hanging hole
- White, red, skin tone, pink and black acrylic paint
- Fine paintbrushes
- Clear sealer
- Ribbon for hanging
How to Make It
- Roll the dough a little thicker than usual, about a third of an inch, so the handprint presses in deeply.
- Press the child hand firmly into the dough with fingers spread, then lift it straight up.
- Trim the dough into a neat round or oval around the print and poke a hanging hole above the thumb.
- Bake low and slow until fully hard, then cool completely.
- Paint the fingers white for the beard, the top of the palm red for the hat, and add a face with rosy cheeks on the palm.
- Write the child name and year on the back, seal the ornament, and add ribbon.
Tip: Press the hand once, firmly and straight down. Wiggly second presses blur the little finger lines that make grandparents tear up.
3. Fingerprint Christmas Tree Ornaments

BuildToddler friendlyPaint after baking
Tree shaped ornaments get their charm from tiny fingerprints pressed in paint and dotted along the branches like Christmas lights. Even toddlers can do the decorating, and adding the year at the bottom turns each one into a small time capsule.
Materials Needed
- One batch of salt dough from idea 1
- Christmas tree cookie cutter
- A straw for hanging holes
- White and green acrylic paint
- Bright paint colors for fingerprint lights
- A fine brush or marker for the star and year
- Clear sealer and twine
How to Make It
- Roll, cut tree shapes and add hanging holes, then bake until hard and cool fully.
- Paint each tree white or green and let the base coat dry.
- Dip fingertips in bright paint and dot rows of lights across the branches.
- Add a small yellow star at the top and write the year at the base.
- Seal once dry and hang with twine.
Tip: Put a pea sized blob of each paint color on a paper plate. Little fingers can dip fast, and the plate keeps colors from mixing into mud.
Printable Bundle
Christmas Printable Bundle
Christmas planner, 24 advent activity cards, 36 gift tags, handmade labels, Santa letter and family games.
4. Handprint and Footprint Keepsake Ornaments

The simplest keepsake of all: press a tiny hand into one round of dough and a tiny foot into another. Left plain white with a little texture from coarse salt, they look soft and timeless, and they capture exactly how small those fingers and toes were this Christmas.
You’ll need: salt dough, a round cutter or a cup for circles, a straw, and ribbon.
Best for: Baby first Christmas keepsakes
5. Handprint Keepsake Ornaments on the Tree

Making one handprint ornament every year builds a story on your tree. A green handprint painted as a tiny tree, a red one as a cardinal, a plain one with just the year: hung together, three or four years of small hands show a childhood growing up branch by branch.
You’ll need: salt dough, paints in green, red and gold, a marker for the year, and ribbon.
Best for: Year by year family traditions
6. Snowman Salt Dough Ornaments

Snowman shapes bake up plump and cheerful. Paint the body white, add a black hat, dot on buttons and paint a red scarf, and a whole tray of snowmen is ready in one afternoon. They look especially sweet hung in a kitchen window.
You’ll need: salt dough, a snowman cutter, white, black, orange and red paint, and twine.
Best for: Kitchen windows and gift baskets
7. Handprint Reindeer and Painted Ornament Sets
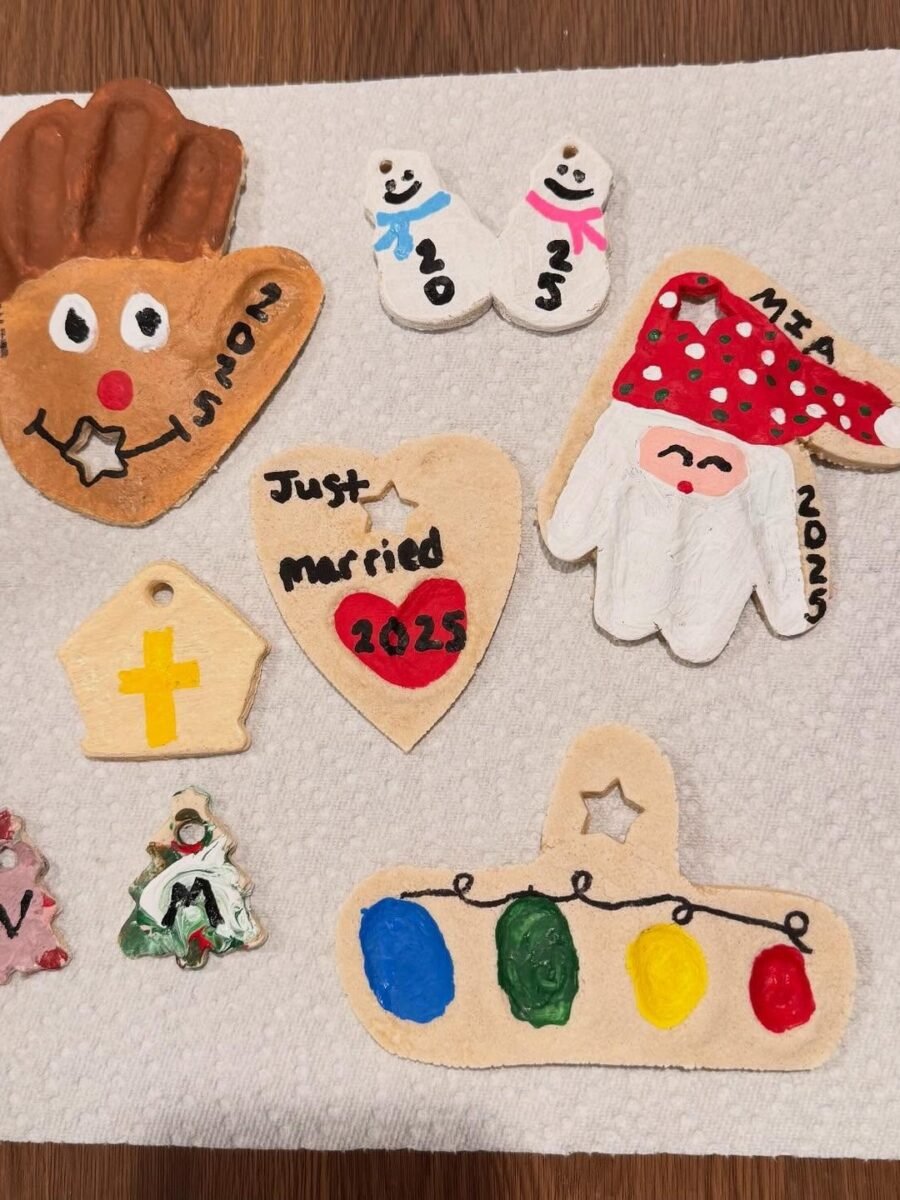
Turn a handprint upside down and the fingers become antlers: paint it brown, add googly eyes and a red nose, and you have a reindeer. Make a mixed tray with stars, trees and hearts in different colors and you have a full painted set from a single batch of dough.
You’ll need: salt dough, brown, red and assorted paints, googly eyes, and ribbon.
Best for: Classroom and family craft days

Printable Games
Christmas Party Games Pack
9 fun games for family, friends and office parties: trivia, charades, gift swap and more.
8. Bright Painted Salt Dough Ornaments
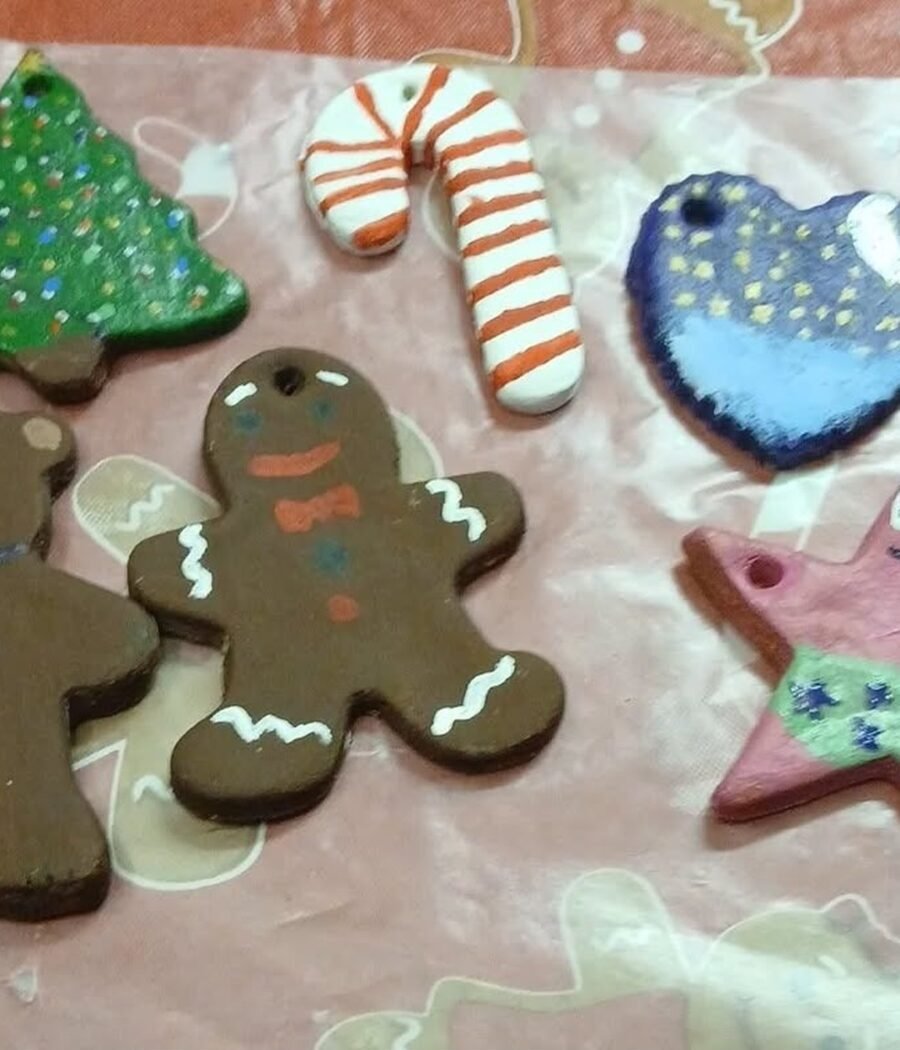
Not every salt dough set needs to be rustic. Bold green trees, a red and white candy cane and a blue heart with yellow stars show how playful these ornaments can be. A painting session with every color open at once is half the fun.
You’ll need: baked salt dough shapes, a full set of acrylic paints, fine brushes, and sealer.
Best for: Painting parties with older kids
9. Tiny Star Salt Dough Ornaments and Garland

Tiny stars are the hardest working ornaments in the box. A bowl of them looks sweet on its own, and strung on bakers twine they become a garland for the tree, the mantel or a child bedroom door. They dry faster than big shapes, so they are perfect when you need a lot of ornaments from one batch.
You’ll need: salt dough, a small star cutter, a straw for holes, and bakers twine.
Best for: Garlands, gift bags and bowl fillers
10. White JOY Letters and Star Ornaments

Left unpainted and lightly textured, salt dough has a calm, ceramic look. Big letters spelling JOY, with plain white stars around them, suit a mantel or a shelf where you want Christmas decor that whispers instead of shouting.
You’ll need: salt dough, letter and star cutters or a knife, and matte sealer.
Best for: Neutral and farmhouse decor
11. Salt Dough Angel Ornament

A molded angel, with curled hair, soft blue wings and a little red heart at her chest, shows how far simple dough can go. Angels take a steadier hand than cut shapes, so save this one for older kids and adults, and make her the special ornament at the top of the tree.
You’ll need: salt dough, a small knife or modeling tool, watercolor or acrylic paint, and ribbon.
Best for: A special top of tree ornament
12. Name Stamped Salt Dough Ornaments

Before baking, press each person name and the year straight into the dough with letter stamps or the tip of a skewer. Trees, gingerbread men and simple rounds all take stamping well. A stamped set makes place settings at Christmas dinner and gifts that truly belong to one person.
You’ll need: salt dough, letter stamps or a skewer, cutters, paint if you like, and twine.
Best for: Place settings and personal gifts
Frequently Asked Questions
What is the best salt dough recipe for ornaments?
Use 2 cups of plain flour, 1 cup of fine table salt and about three quarters of a cup of warm water. Knead for about 5 minutes until smooth. Fine salt gives a smoother finish than coarse salt, and the dough should feel like soft play dough, not sticky and not crumbly.
Is salt dough edible?
No. Salt dough ornaments are decorations only and must never be eaten. The dough contains a large amount of salt, which is dangerous for pets and not safe for children to eat. Always supervise young children while making them, wash hands after crafting, and hang finished ornaments where pets cannot reach them.
How long do salt dough ornaments need to bake?
At 250 degrees Fahrenheit, a quarter inch thick ornament takes about 2 to 3 hours to dry out fully. Thicker handprint pieces can take longer. The ornament should feel hard and light, with no soft or damp center. You can also air dry them on a rack for 2 to 3 days, turning them daily.
Why did my salt dough ornaments puff up or crack?
Puffing usually means the dough was too thick or the oven was too hot, so bake low and slow and roll the dough evenly at about a quarter inch. Cracks often come from drying too fast or dough that was a little dry; knead in a spoon of water if the dough cracks while you roll it.
How do you make salt dough ornaments last for years?
Dry them completely, paint them, then seal both sides with a clear craft sealer once the paint is dry. Store them in a dry box with tissue between layers, away from damp rooms and humid attics. Well sealed ornaments easily last for decades.
What paint works best on salt dough?
Acrylic craft paint is the best choice. It covers the pale dough in one or two coats, dries fast and comes in every Christmas color. Watercolors give a softer, lighter look on angels and unpainted style pieces. Always let paint dry fully before sealing.
Final Thoughts on Salt Dough Christmas Ornaments
Three cheap ingredients, one slow afternoon and a warm oven: that is all a box of Christmas keepsakes really takes. Salt dough forgives wobbly edges and uneven paint, and somehow those are the ornaments everyone loves most.
Make a batch this year, press in a few small hands, and write the year on the back of every piece. Future you, decorating a future tree, will be very glad you did. Just remember to keep them on the tree and off the cookie plate, because these treats are for eyes only.

