

Air dry clay is the craft that asks for nothing: no kiln, no oven, no wheel, no experience. You open a packet, roll it out, shape it with your hands and leave it on the counter. A day or two later it is hard, white and ready to paint, and it looks far more expensive than it was.

These twelve air dry clay crafts begin with three builds worth learning properly: leaf impression ornaments, the classic trinket dish and mini pots from homemade dough. After that, nine more ideas cover gift tags, candle holders, wall hangings and dishes in every shape.
Work on a smooth surface with a small bowl of water nearby; a wet fingertip is the only fancy tool you truly need. Keep pieces at least a quarter inch thick and dry them slowly, and cracks will mostly stay away.
Start with the dish. Everyone in clay history started with the dish, and half of them never really stopped making it.
Quick Picks
- Start here: The Classic Trinket Dish (idea 2)
- Most beautiful: Leaf Impression Ornaments (idea 1)
- Best gift: Botanical Clay Gift Tags (idea 7)
1. Leaf Impression Ornaments
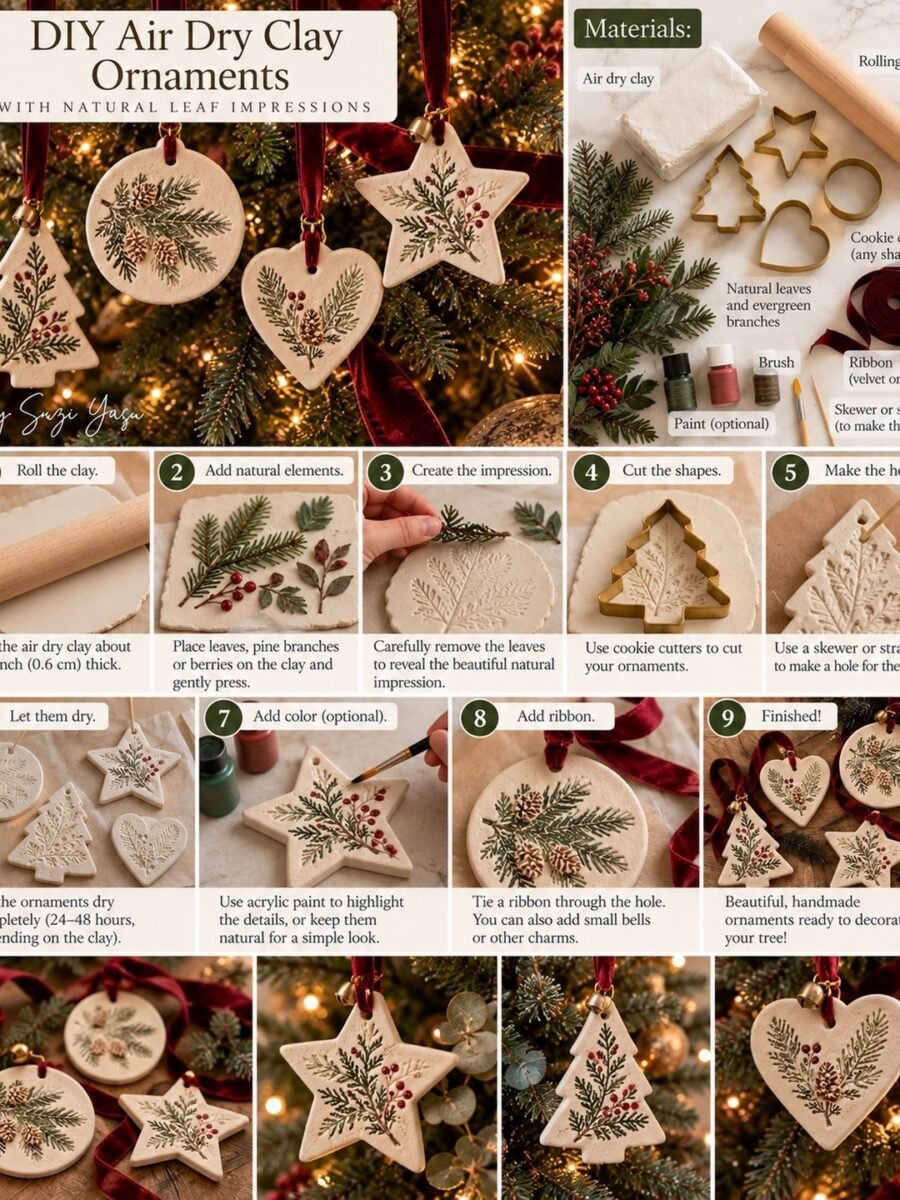
BuildAbout 30 minutes plus dryingNature does the art
Press a real leaf into rolled clay and nature does the artwork for you. These ornaments carry every vein of the leaf, and no two come out alike. The same pressing trick works with evergreen sprigs, rosemary and lace. If you enjoy dough crafts generally, our salt dough christmas ornaments are the edible flour cousin of this build.
Materials Needed
- Air dry clay, white
- Rolling pin and a smooth board
- Fresh leaves, evergreen sprigs or lace
- Cookie cutters or a knife
- A straw for the hanging hole
- Twine or ribbon
- Optional: acrylic paint and a fine brush
How to Make It
- Roll the clay to about a quarter inch thick on a smooth surface.
- Lay a leaf vein side down on the clay and roll over it once, firmly, so the pattern presses in.
- Lift the leaf away carefully from one corner, keeping the impression clean.
- Cut around the impression with a cutter or knife, and poke a hole at the top with a straw.
- Smooth the edges with a wet fingertip and lay the ornament flat on parchment.
- Dry for 24 to 48 hours, turning once, then thread twine through the hole.
- Optional: wash a little paint into the veins and wipe the surface so the pattern stands out.
Tip: Pick leaves with strong veins: sage, fern and evergreen press best. Soft leaves tear; stiff ones print like stamps.
2. The Classic Trinket Dish
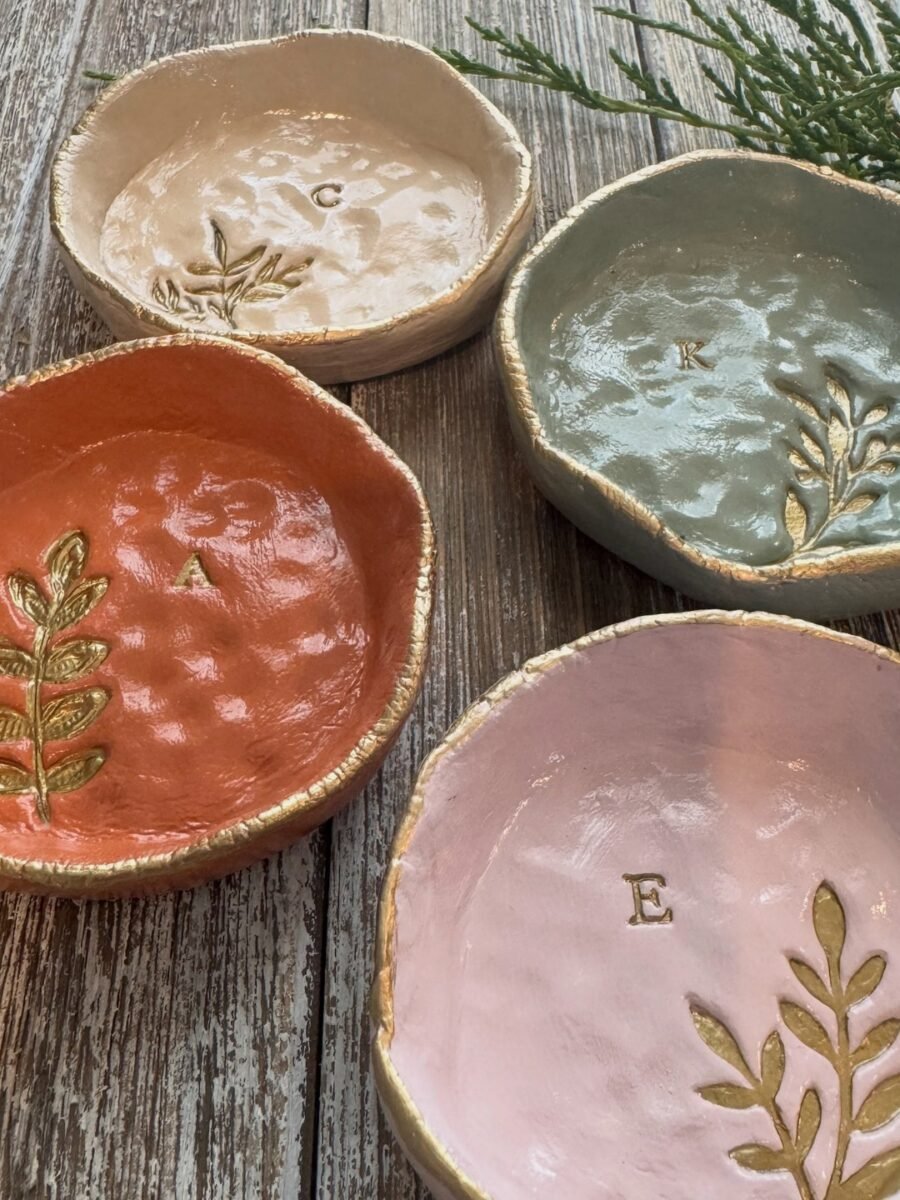
BuildAbout 20 minutes plus dryingThe best first project
The trinket dish is the project that turns clay skeptics into clay people. It is a flattened ball of clay shaped over a bowl, and it forgives every wobble. Stamp an initial and paint the rim gold, and a two dollar lump of clay looks like a boutique gift.
Materials Needed
- Air dry clay
- A small bowl to use as a mold
- Rolling pin
- A knife or clay tool
- Sandpaper, fine grit
- Acrylic paint and a gold paint pen
- Clear sealer, matte or gloss
How to Make It
- Roll the clay into a slab about a quarter inch thick.
- Cut a circle a little larger than your mold bowl, using a plate as a guide.
- Drape the circle over the outside of an upturned bowl, or press it gently inside, smoothing with wet fingers.
- Trim the edge uneven on purpose for an organic look, or cut it clean for a modern one.
- Let it dry on the mold for 24 hours, then lift it off and dry the other side for a day.
- Sand the rim smooth, paint or stamp your design, add a gold rim, and seal it.
Tip: Dry dishes slowly away from heaters. Fast drying is what cracks clay; patience is the whole secret.
Seasonal Special
Winter Home Reset Kit
8 printable pages to warm up your home, get holiday guest ready and stay cozy all season.
Get the Kit3. Mini Clay Pots From Homemade Dough
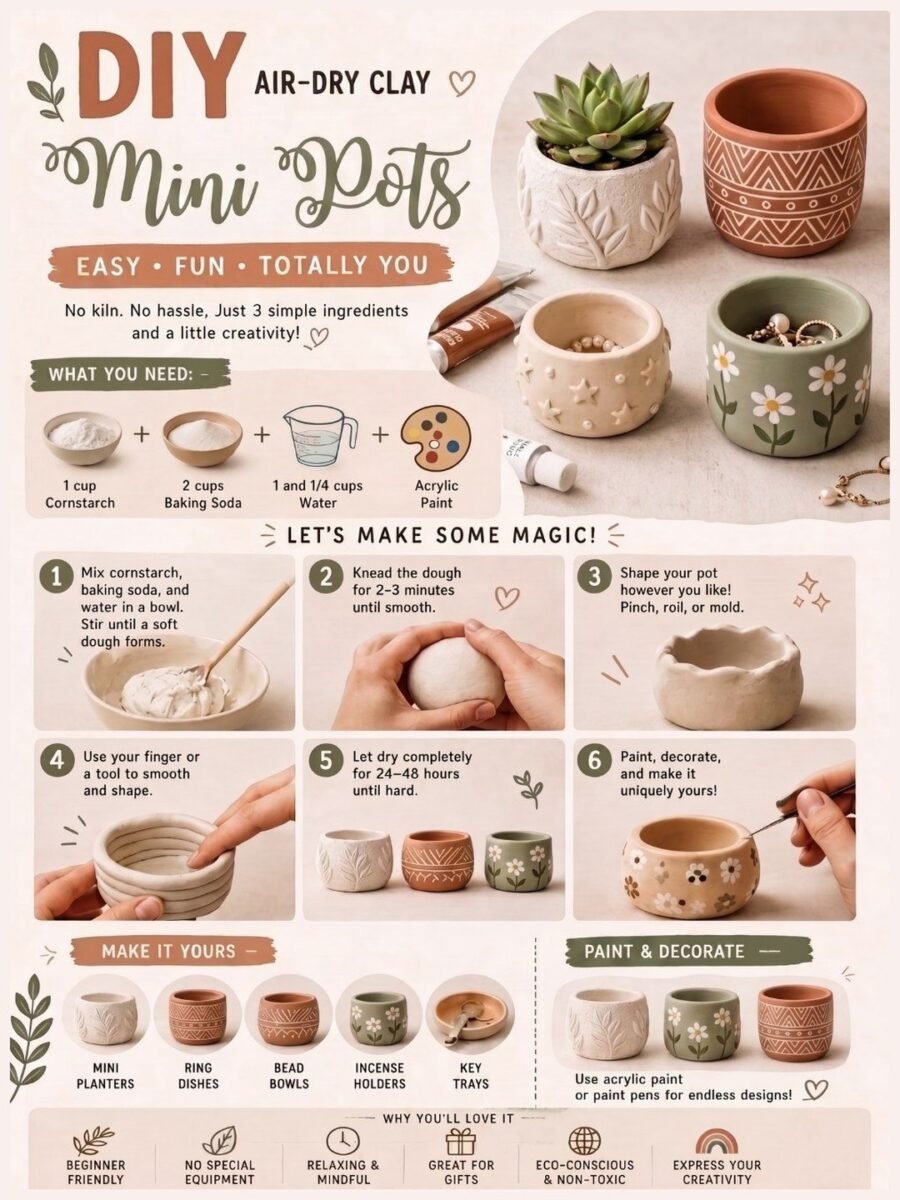
BuildAbout 15 minutes each plus dryingPennies per pot
Mini pots hold rings, succulents, incense and desk clutter, and they are the fastest way to use up a bag of clay. This version even starts from homemade dough, cornstarch and baking soda cooked into a smooth white clay, so a whole set costs pennies.
Materials Needed
- Air dry clay, or homemade dough: 1 cup cornstarch, 2 cups baking soda, 1 and a quarter cups water
- A small cup or your thumbs for shaping
- Acrylic paints
- A fine brush
- Clear sealer
How to Make It
- If making dough: stir the ingredients in a pan over medium heat until it thickens like mashed potato, cool it, then knead for 2 to 3 minutes until smooth.
- Pinch off a ball of clay and roll it smooth between your palms.
- Push your thumb into the center and pinch the walls round and round until a little pot forms, keeping the walls even.
- Flatten the base so it stands, and smooth any cracks with a wet finger.
- Dry for 24 to 48 hours until hard and white all through.
- Paint, decorate, and seal. Add a drainage pebble layer if a real plant moves in.
Tip: Keep a small bowl of water beside you. A wet fingertip erases cracks, fingerprints and joins like magic.
4. Painted Round Ornaments
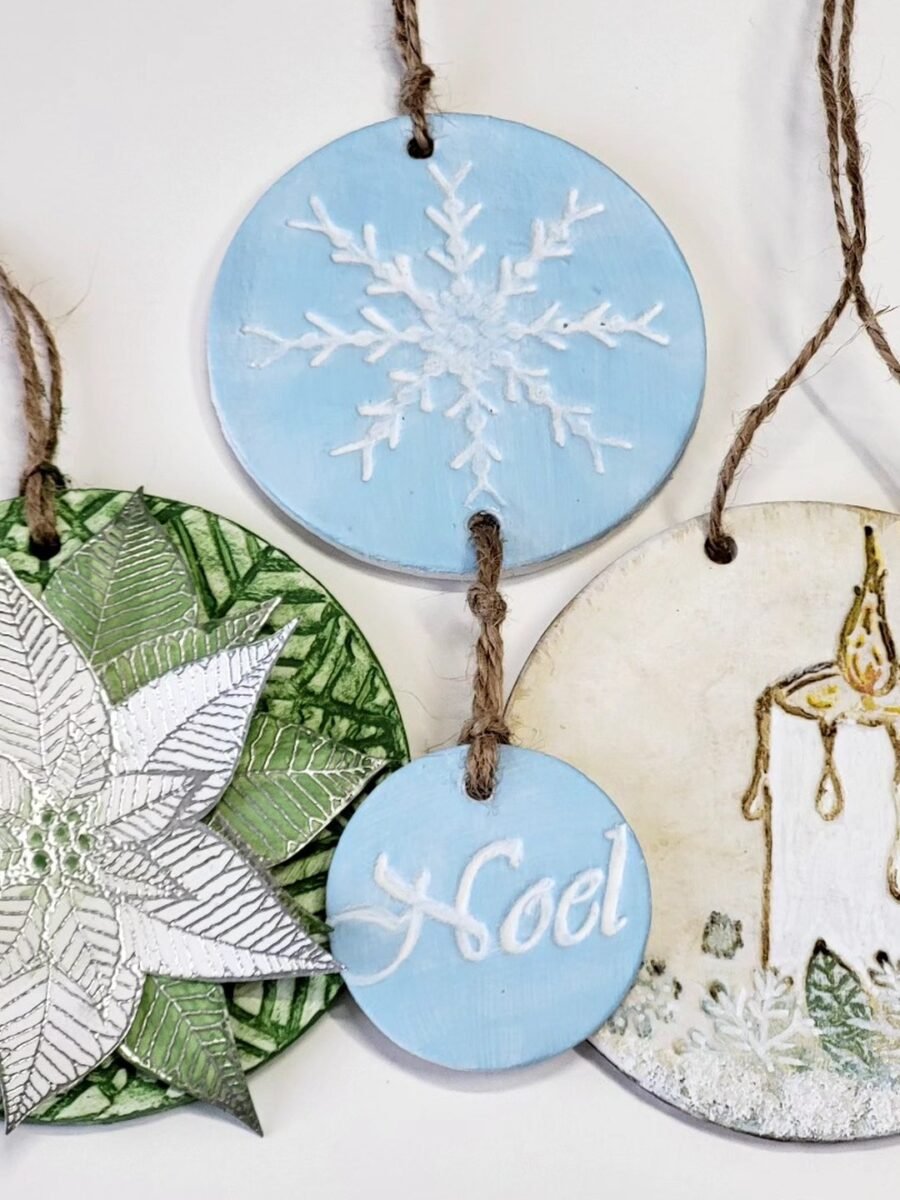
Roll, cut circles, dry, then paint. A raised snowflake on blue, a script Noel, a poinsettia: each disc is a tiny painting that happens to hang. Painted ornaments reward a steady hand and forgive everything else, because a coat of paint hides a multitude of clay sins.
You’ll need: clay discs, a straw hole, acrylic paint, and twine.
Best for: A painted set for one special tree corner
5. The Simple Steps Ornament Method
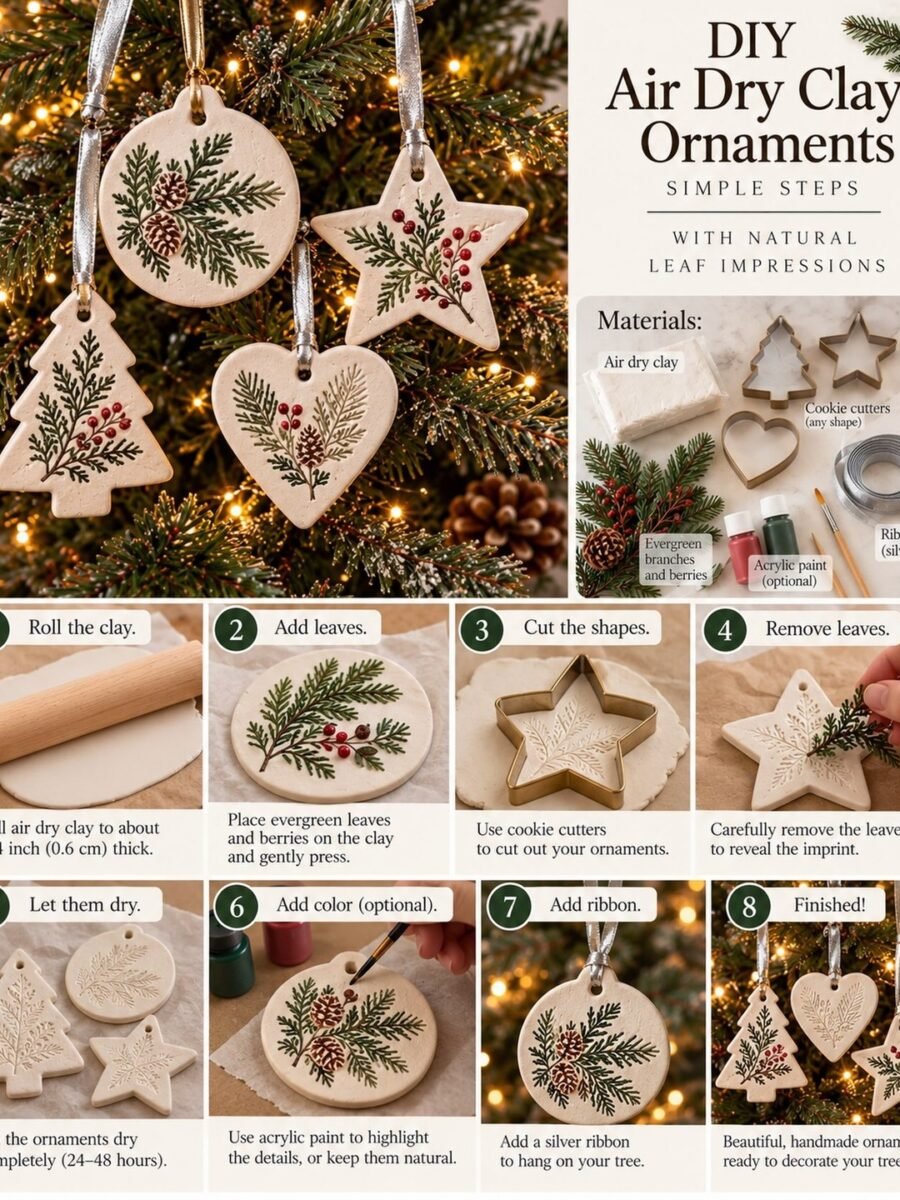
If the build above felt detailed, this is the same idea boiled down to a one page recipe: roll, press leaves, cut shapes, dry, hang. Makers return to this method every December because it simply works. Our air dry clay christmas ornaments post gathers more shapes in this style.
You’ll need: clay, leaves, cutters, a straw, and ribbon.
Best for: Following a simple visual recipe
6. Rustic Ornaments on Twine
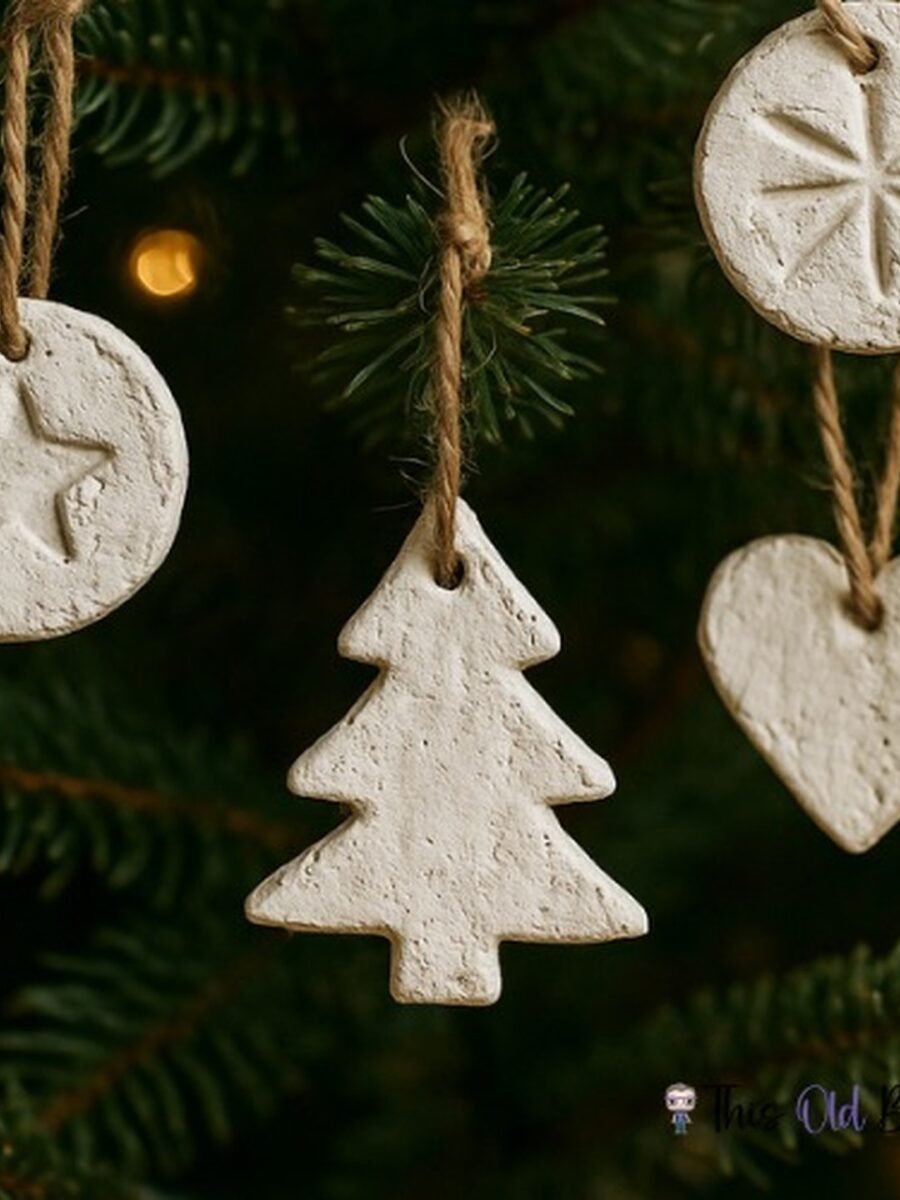
No paint, no glaze, no fuss: plain clay cut into trees and hearts, hung on rough twine. The matte off white against dark green branches is the whole effect. These are the ornaments to make when the tree goes up tomorrow and the craft box is nearly empty.
You’ll need: clay, simple cutters, twine, and no paint at all.
Best for: Farmhouse and neutral trees
7. Botanical Clay Gift Tags

A gift tag the receiver keeps is a small ornament in disguise. These carry raised evergreen and berry designs, hang on linen and velvet ribbons, and move from the present to the tree on the same morning. Make a batch in November and every December gift is finished.
You’ll need: clay, botanical stamps or real sprigs, a rolling pin, and ribbons.
Best for: Gifts that get kept, not thrown away
8. A Whole Collection of Painted Dishes
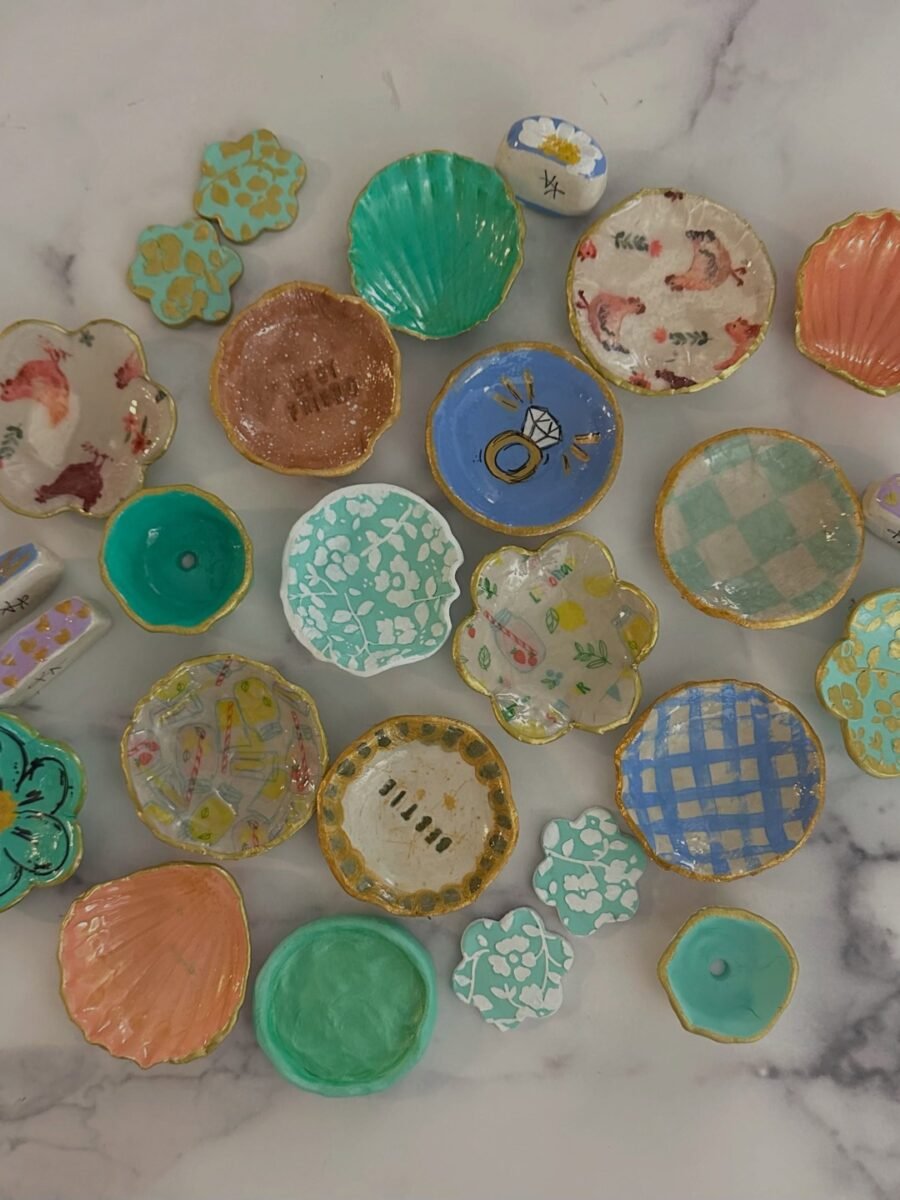
One dish is a project; two dozen are a collection, and collections are where the fun is. Shells, flowers, gingham, tiny chickens, gold edges: lay them out together and they look like a market stall. Paint dishes in sets of colors that match your home and keep the extras as ready made gifts.
You’ll need: clay, small molds, paints in your palette, and a free afternoon.
Best for: Craft fair tables and gift drawers
9. A Heart Shaped Ring Dish
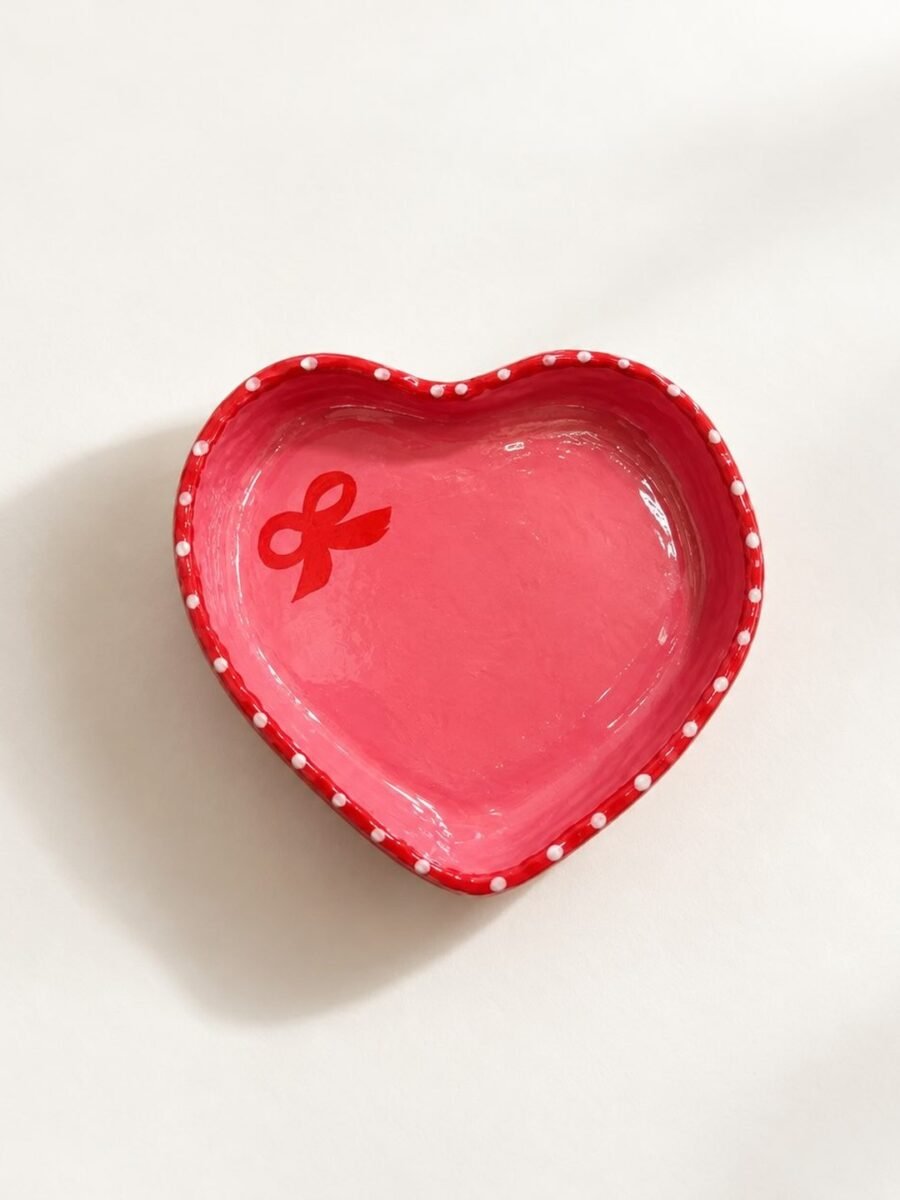
Every kitchen sink and bedside table deserves a ring dish, and a heart shape makes it a gift instead of a utensil. Pink inside, red rim, white dots, one tiny bow: twenty minutes of painting on a shape that took ten minutes to make. Seal it well; it will live near water.
You’ll need: clay, a heart cutter or template, pink and red paint, and sealer.
Best for: Rings by the sink and sweet small gifts
10. A Wavy Edged Dish in Deep Teal
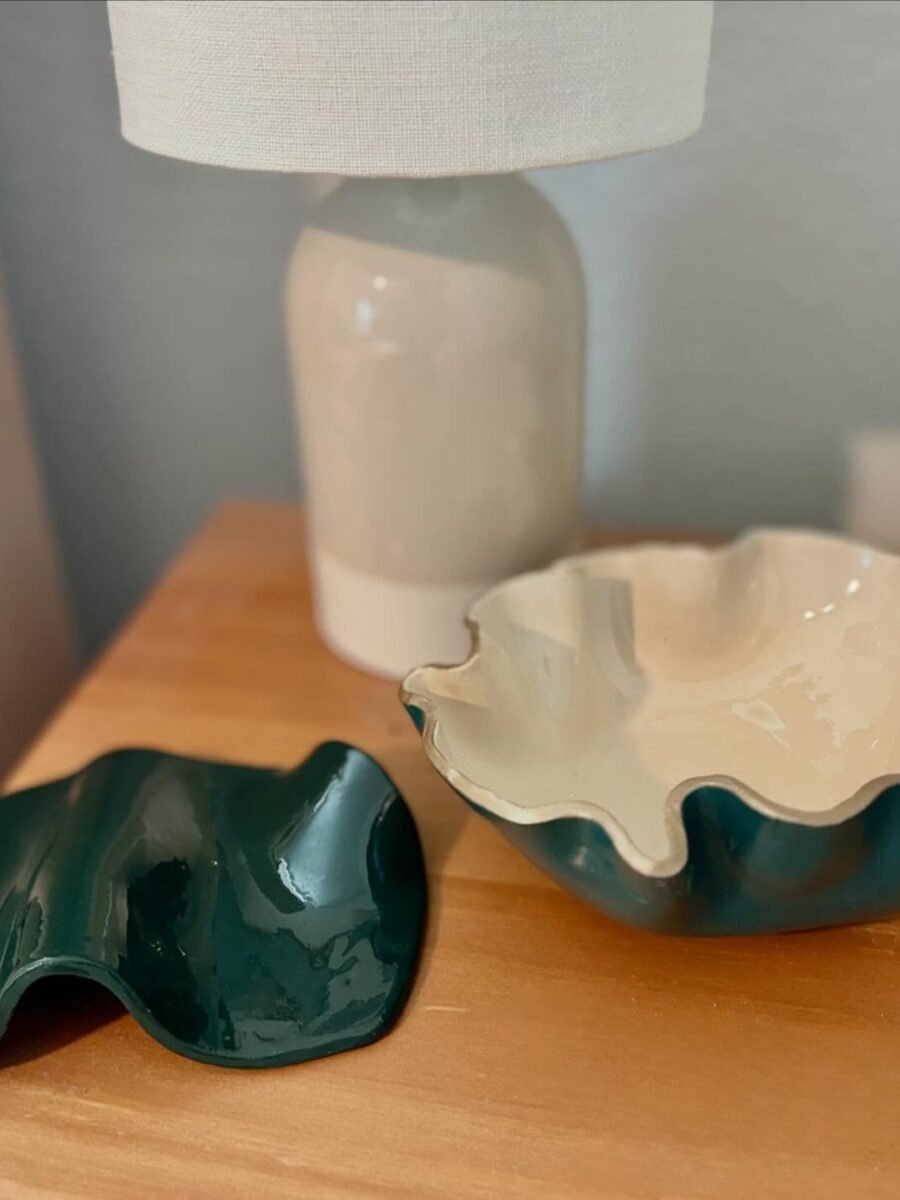
Let the edge go wavy, like a shell or a leaf, and paint it deep teal with a glossy finish, and a simple dish becomes the piece guests pick up. Bigger than a trinket dish, it holds keys, coins and compliments on an entry table. The gloss is what sells the ceramic illusion.
You’ll need: clay, a bowl mold, teal paint or glaze style acrylic, and gloss sealer.
Best for: Coffee tables and entry consoles
11. A Geometric Clay Wall Hanging
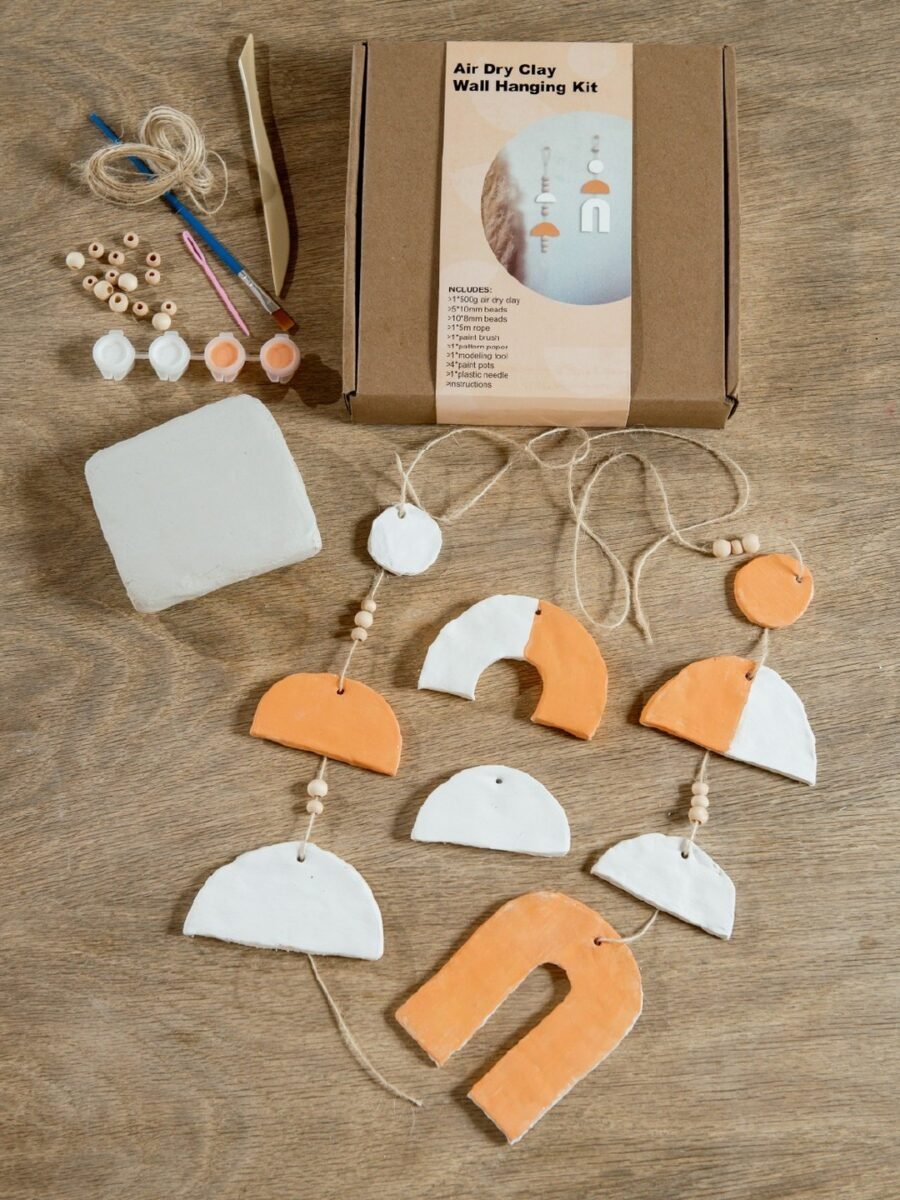
Cut half moons, arches and circles, paint them in two colors, and string them into a hanging that moves gently on the wall. Kits like this one gather everything in a box, which makes them a kind gift, but the pieces are simple enough to cut freehand from any packet of clay.
You’ll need: clay, a knife, string or rope, beads, and paint in two colors.
Best for: A first wall piece, or a craft kit gift
12. Pierced Dome Candle Holders
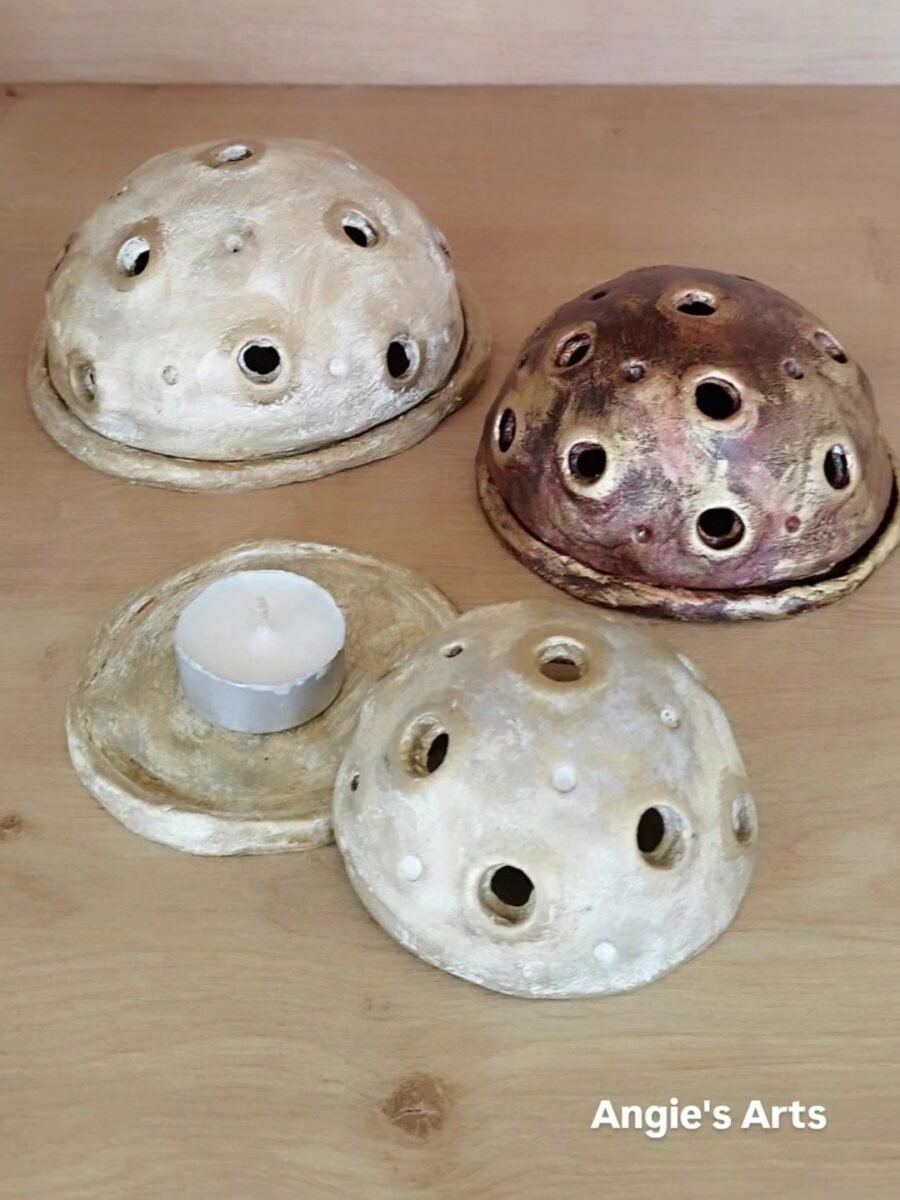
Shape a dome over a small bowl, pierce it with holes while soft, and set it over a tea light: the light comes through like stars. Off white and bronze finishes keep them calm. Use battery tea lights so the clay never heats, and group two or three where the evening needs softening.
You’ll need: clay, a small bowl mold, a skewer for holes, and battery tea lights.
Best for: Evenings, bathrooms and calm corners
Frequently Asked Questions
How long does air dry clay take to dry?
Most pieces need 24 to 48 hours depending on thickness. Thin ornaments dry in a day; dishes and pots can take two. The clay is ready when it feels room temperature rather than cool, looks evenly white, and sounds hard when tapped. Drying slowly, away from heat, prevents cracks.
Can air dry clay get wet or hold food?
It is not waterproof or food safe, even sealed. Use dishes for rings, keys and dry trinkets, line plant pots with a plastic inner pot, and keep clay out of sinks and aquariums. A good sealer shrugs off a splash, but soaking will soften it again.
Why did my clay crack while drying?
Cracks come from drying too fast or rolling too thin. Keep pieces at least a quarter inch thick, dry them slowly away from radiators and sun, and turn them once so both sides dry evenly. Small cracks fill beautifully with a paste of clay and water, sanded after drying.
What paint works on air dry clay?
Acrylic paint is the standard: cheap, bright and it seals slightly as it dries. Paint after the clay is fully dry, never before, or the moisture gets trapped. Finish with a clear sealer, matte for a stone look or gloss for a ceramic look.
Is air dry clay safe for kids?
Yes, with the usual craft table rules: it is non toxic in most brands, but check the packet, supervise small children so pieces do not get eaten, and wash hands after. Keep finished clay pieces with small parts away from babies and pets, like any small object.
How do I store leftover clay?
Store unused clay in an airtight bag with the air squeezed out, inside a sealed tub. A slightly damp paper towel in the tub keeps it soft for weeks. If the surface dries a little, knead in a few drops of water and it comes back to life.
Final Thoughts on Air Dry Clay Crafts
Air dry clay asks for so little: no kiln, no oven, no experience, just a lump of clay and a quiet hour. Start with the trinket dish, press a leaf into an ornament, and the rest of this list will happen on its own over the next few weekends.
Keep your first pieces. A year of clay later, that wobbly first dish will be the one you would never give away.

